生产部署
# 常规部署
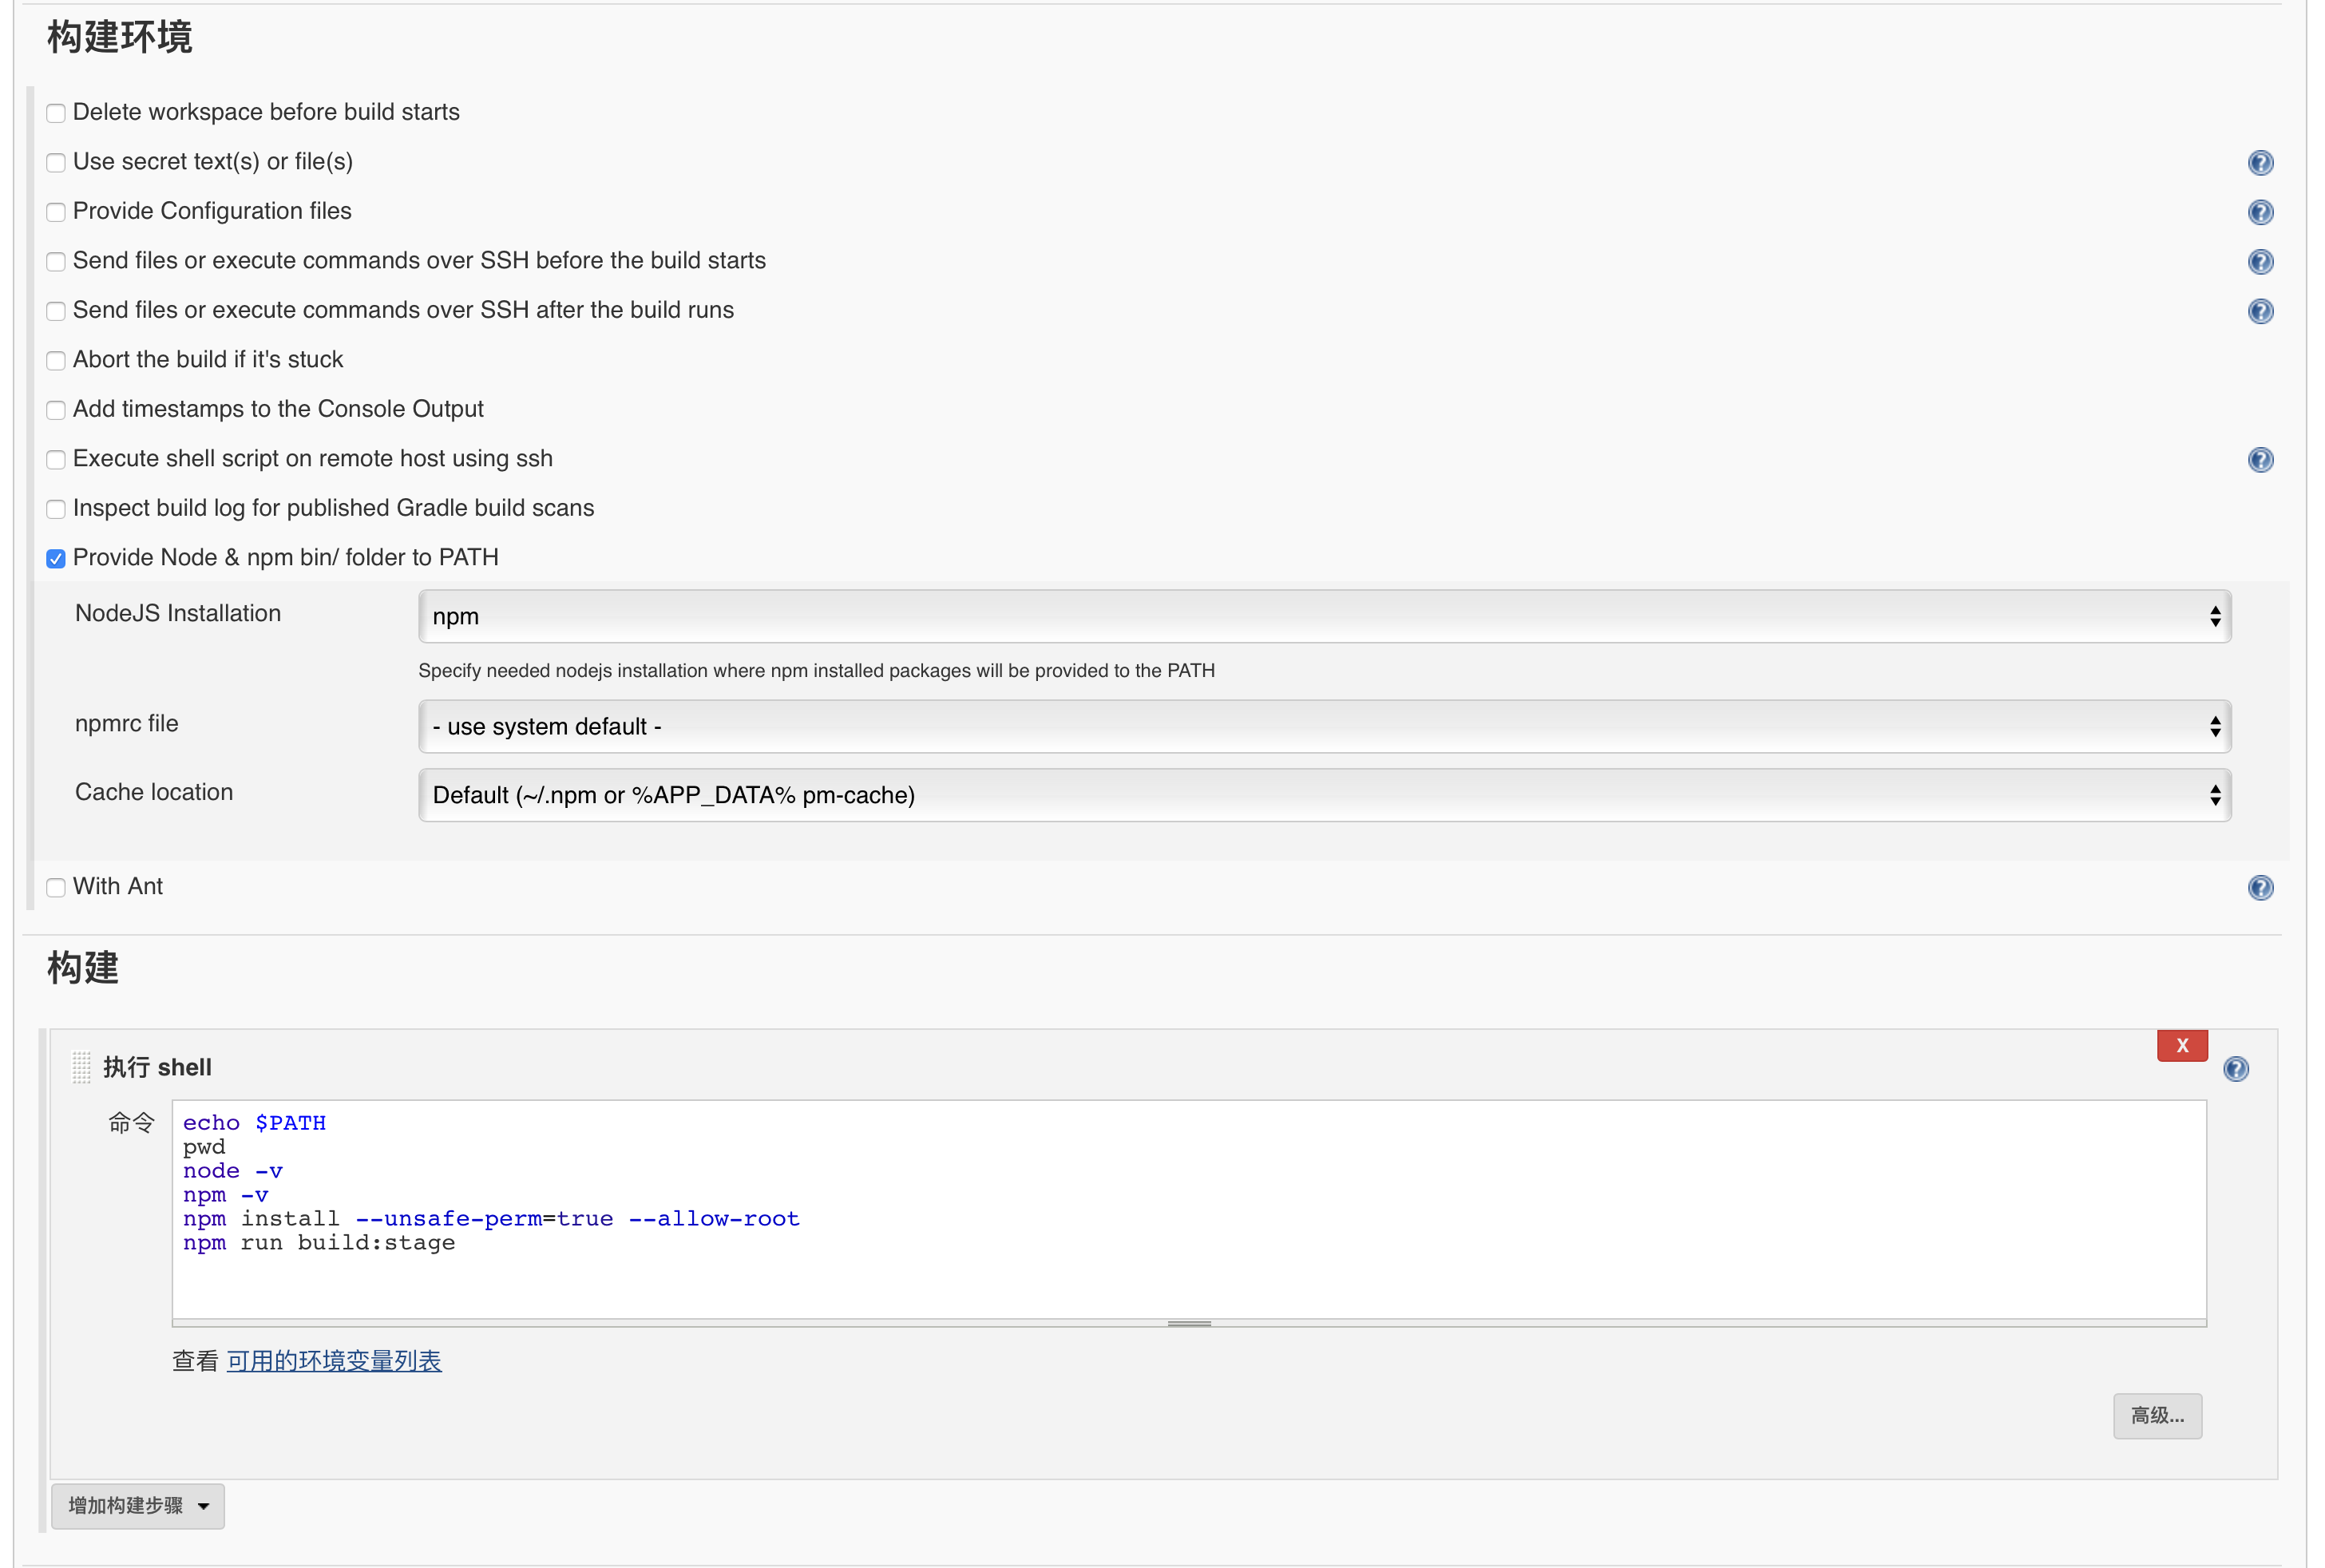
# 前端部署
#打包测试环境
npm run build:stage

#打包生产环境
npm run build:prod
1
2
3
4
5
2
3
4
5
1
2
3
4
5
2
3
4
5
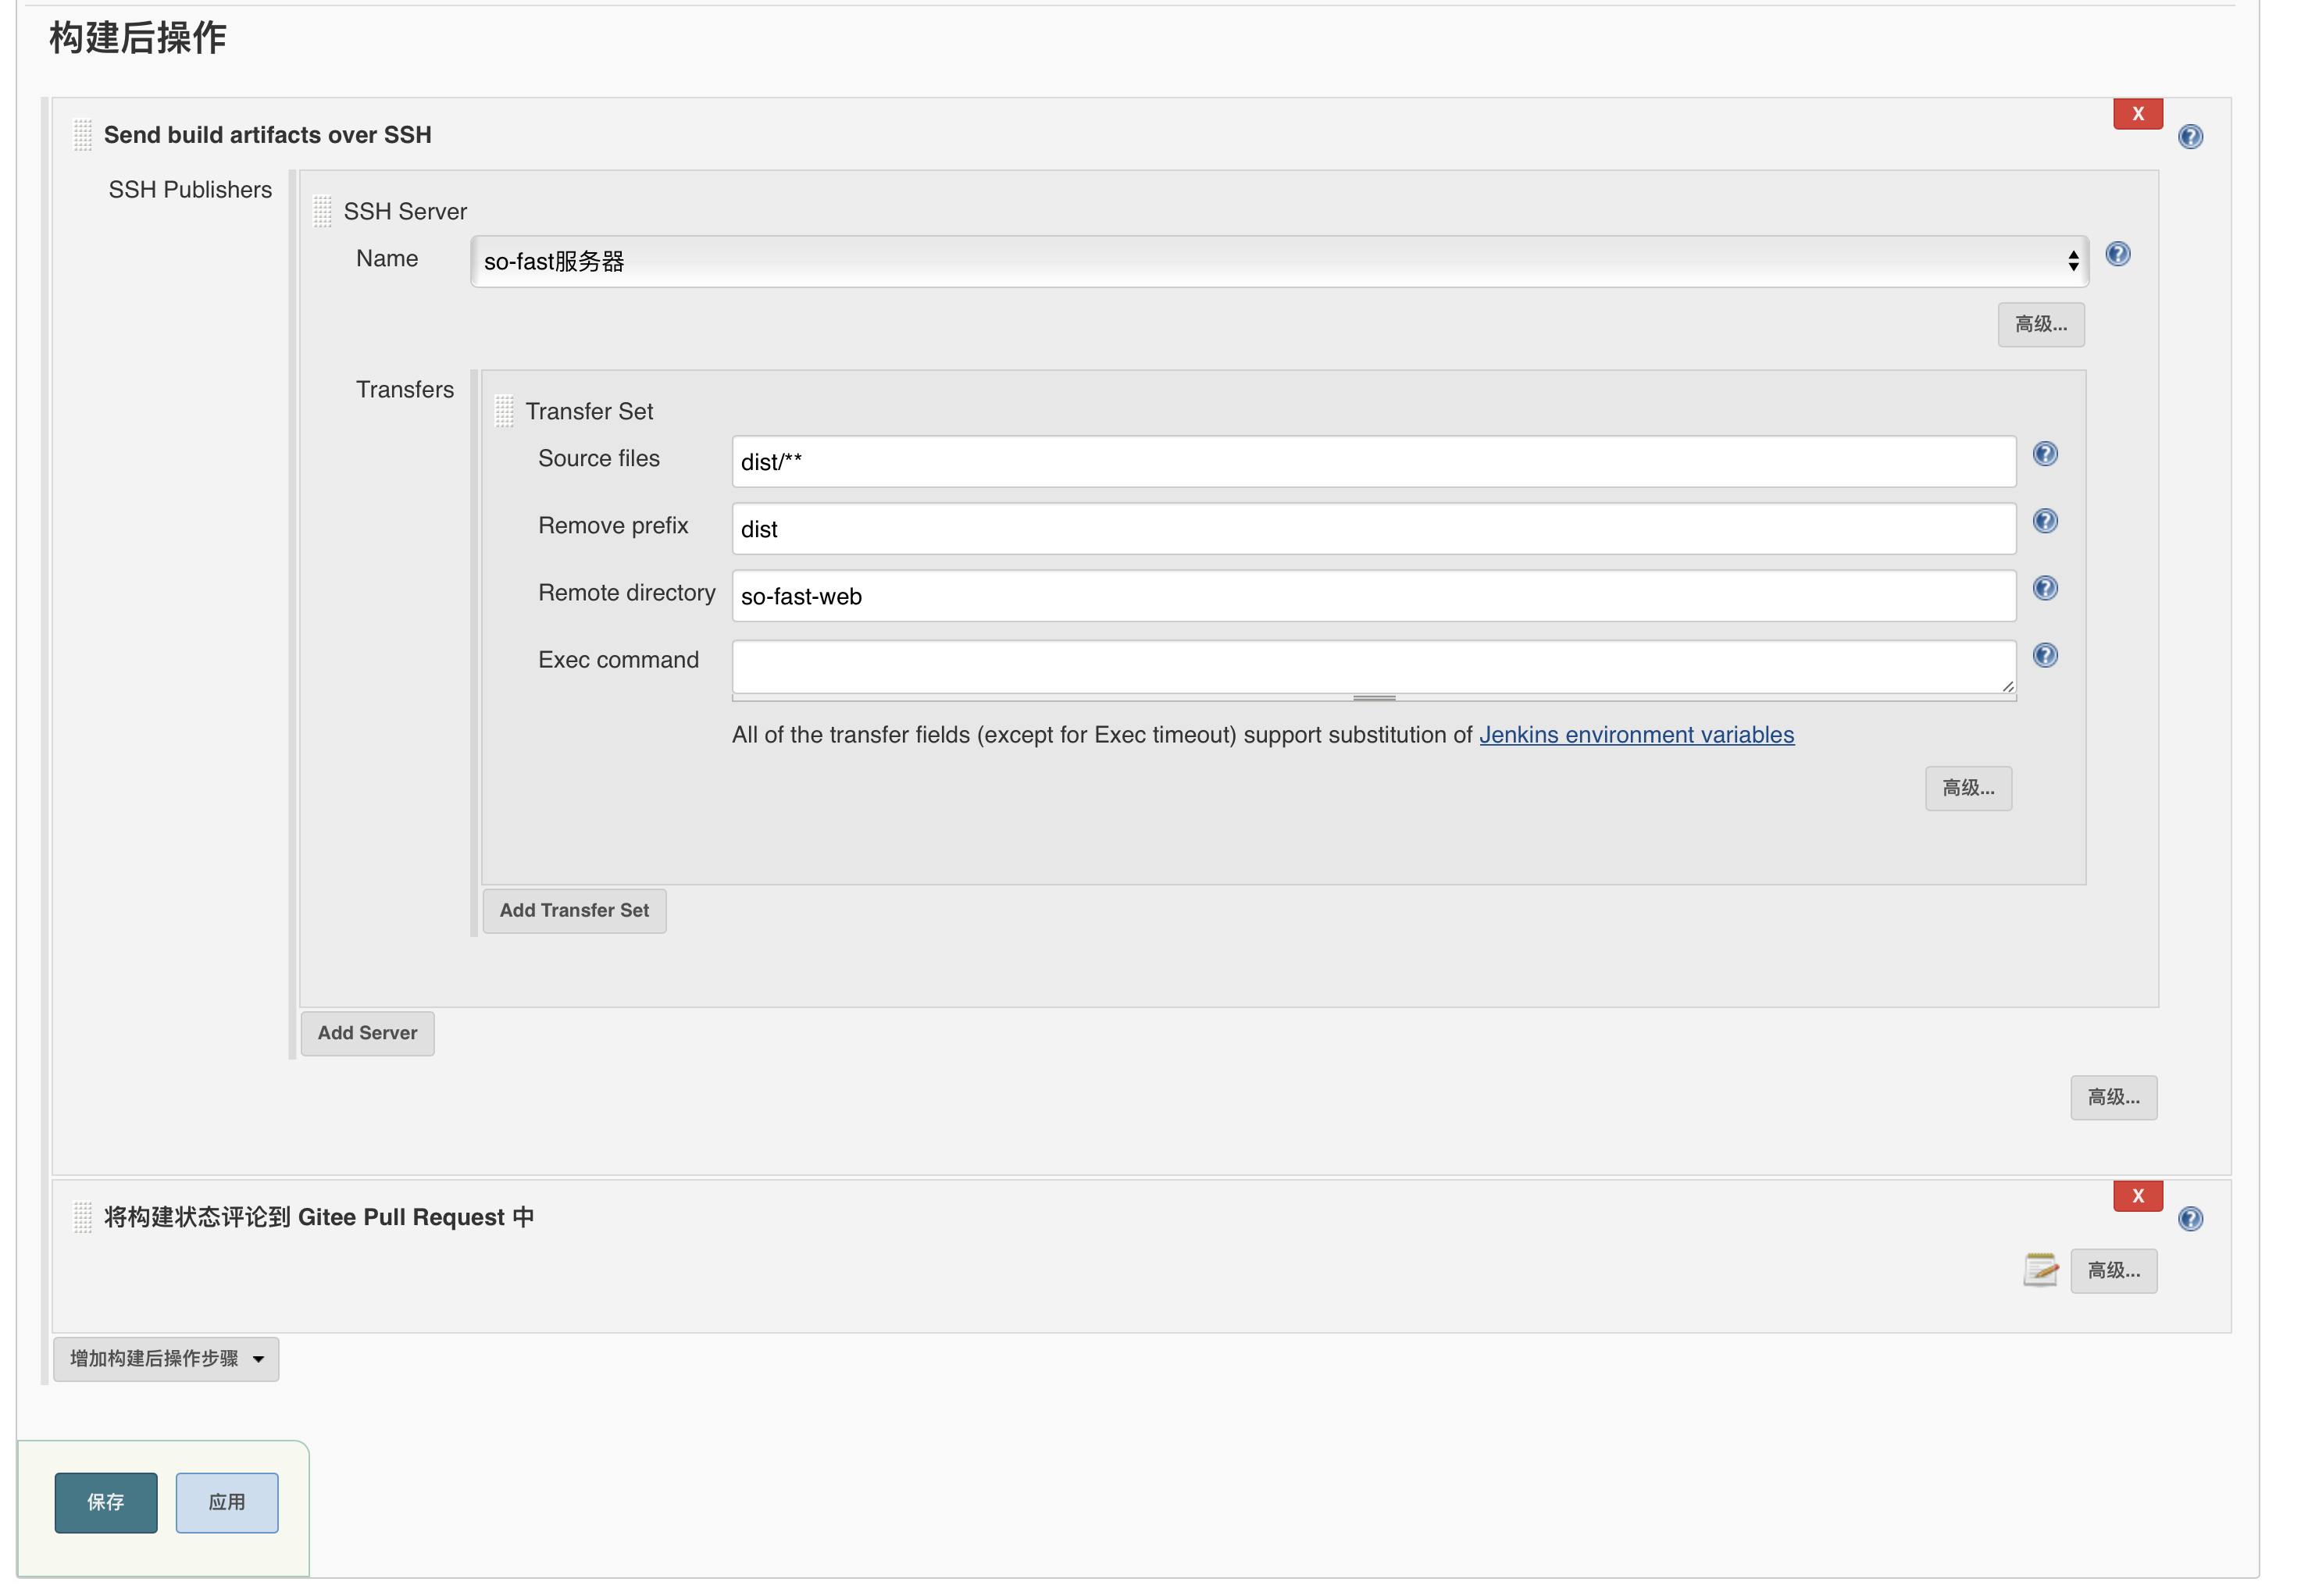
构建成功后,会在当前目录内生成 dist 目录,将该目录部署到 Nginx 内,即完成部署。Nginx 配置通常如下:
    server {
        listen 80;
        #指定根目录
        root /so-fast-web-path/dist/;
        #访问地址
        location / {
            try_files $uri $uri/ /index.html;
        }
                # API网关反向代理
        location ^~/stage-api/ {
            proxy_pass http://localhost:9000/;
        }

                // 文件、图片预览配置
        location ^~/avatar/ {
            root /mnt/sofast/;
        }
        location ^~/images/ {
            root /mnt/sofast/;
        }
        location ^~/files/ {
            root /mnt/sofast/;
        }
    }
1
2
3
4
5
6
7
8
9
10
11
12
13
14
15
16
17
18
19
20
21
22
23
24
2
3
4
5
6
7
8
9
10
11
12
13
14
15
16
17
18
19
20
21
22
23
24
1
2
3
4
5
6
7
8
9
10
11
12
13
14
15
16
17
18
19
20
21
22
23
24
2
3
4
5
6
7
8
9
10
11
12
13
14
15
16
17
18
19
20
21
22
23
24
如果要启用 https,请参照一下配置
server {

        listen 8285 ssl;
        server_name 域名;
        ssl_certificate  cert/证书.pem;
        ssl_certificate_key cert/证书.key;
        ssl_session_timeout 5m;
        ssl_ciphers ECDHE-RSA-AES128-GCM-SHA256:ECDHE:ECDH:AES:HIGH:!NULL:!aNULL:!MD5:!ADH:!RC4;
        ssl_protocols TLSv1 TLSv1.1 TLSv1.2;
        ssl_prefer_server_ciphers on;

        root /opt/so-fast-cloud/jenkins/so-fast-web-cloud/;

        location / {
            try_files $uri $uri/ /index.html;
        }

        location ^~/stage-api/ {
            proxy_pass http://localhost:9000/;
        }
        #。。。其他配置。。。

        # http访问时,会强制跳转到https
        error_page 497 https://$host:8285$uri?$args;
    }
1
2
3
4
5
6
7
8
9
10
11
12
13
14
15
16
17
18
19
20
21
22
23
24
25
2
3
4
5
6
7
8
9
10
11
12
13
14
15
16
17
18
19
20
21
22
23
24
25
1
2
3
4
5
6
7
8
9
10
11
12
13
14
15
16
17
18
19
20
21
22
23
24
25
2
3
4
5
6
7
8
9
10
11
12
13
14
15
16
17
18
19
20
21
22
23
24
25
# 后端部署
1.mysql 数据库运行确认
请确保已经安装并启动 mysql 数据库,并导入建库脚本文件。
脚本文件位置:db 目录
2.redis 运行确认
请确保已经安装并启动 redis 服务。
3.nacos 运行确认
从官网下载 1.4.2 版 nacos-service,修改配置文件,连接到运行的 mysql 数据库,启动并确认 http://localhost:8848/nacos 是否可以正常访问。
4. 配置中心导入
将 nacos 目录下的配置文件导入到 nacos server 中。并修改 mysql、redis 等连接地址。
如果有文件上传,需要修改对应的上传目录地址,并设置必要目录文件权限
其他配置不建议修改,系统调优时,可以择机调整部分参数进行系统优化。
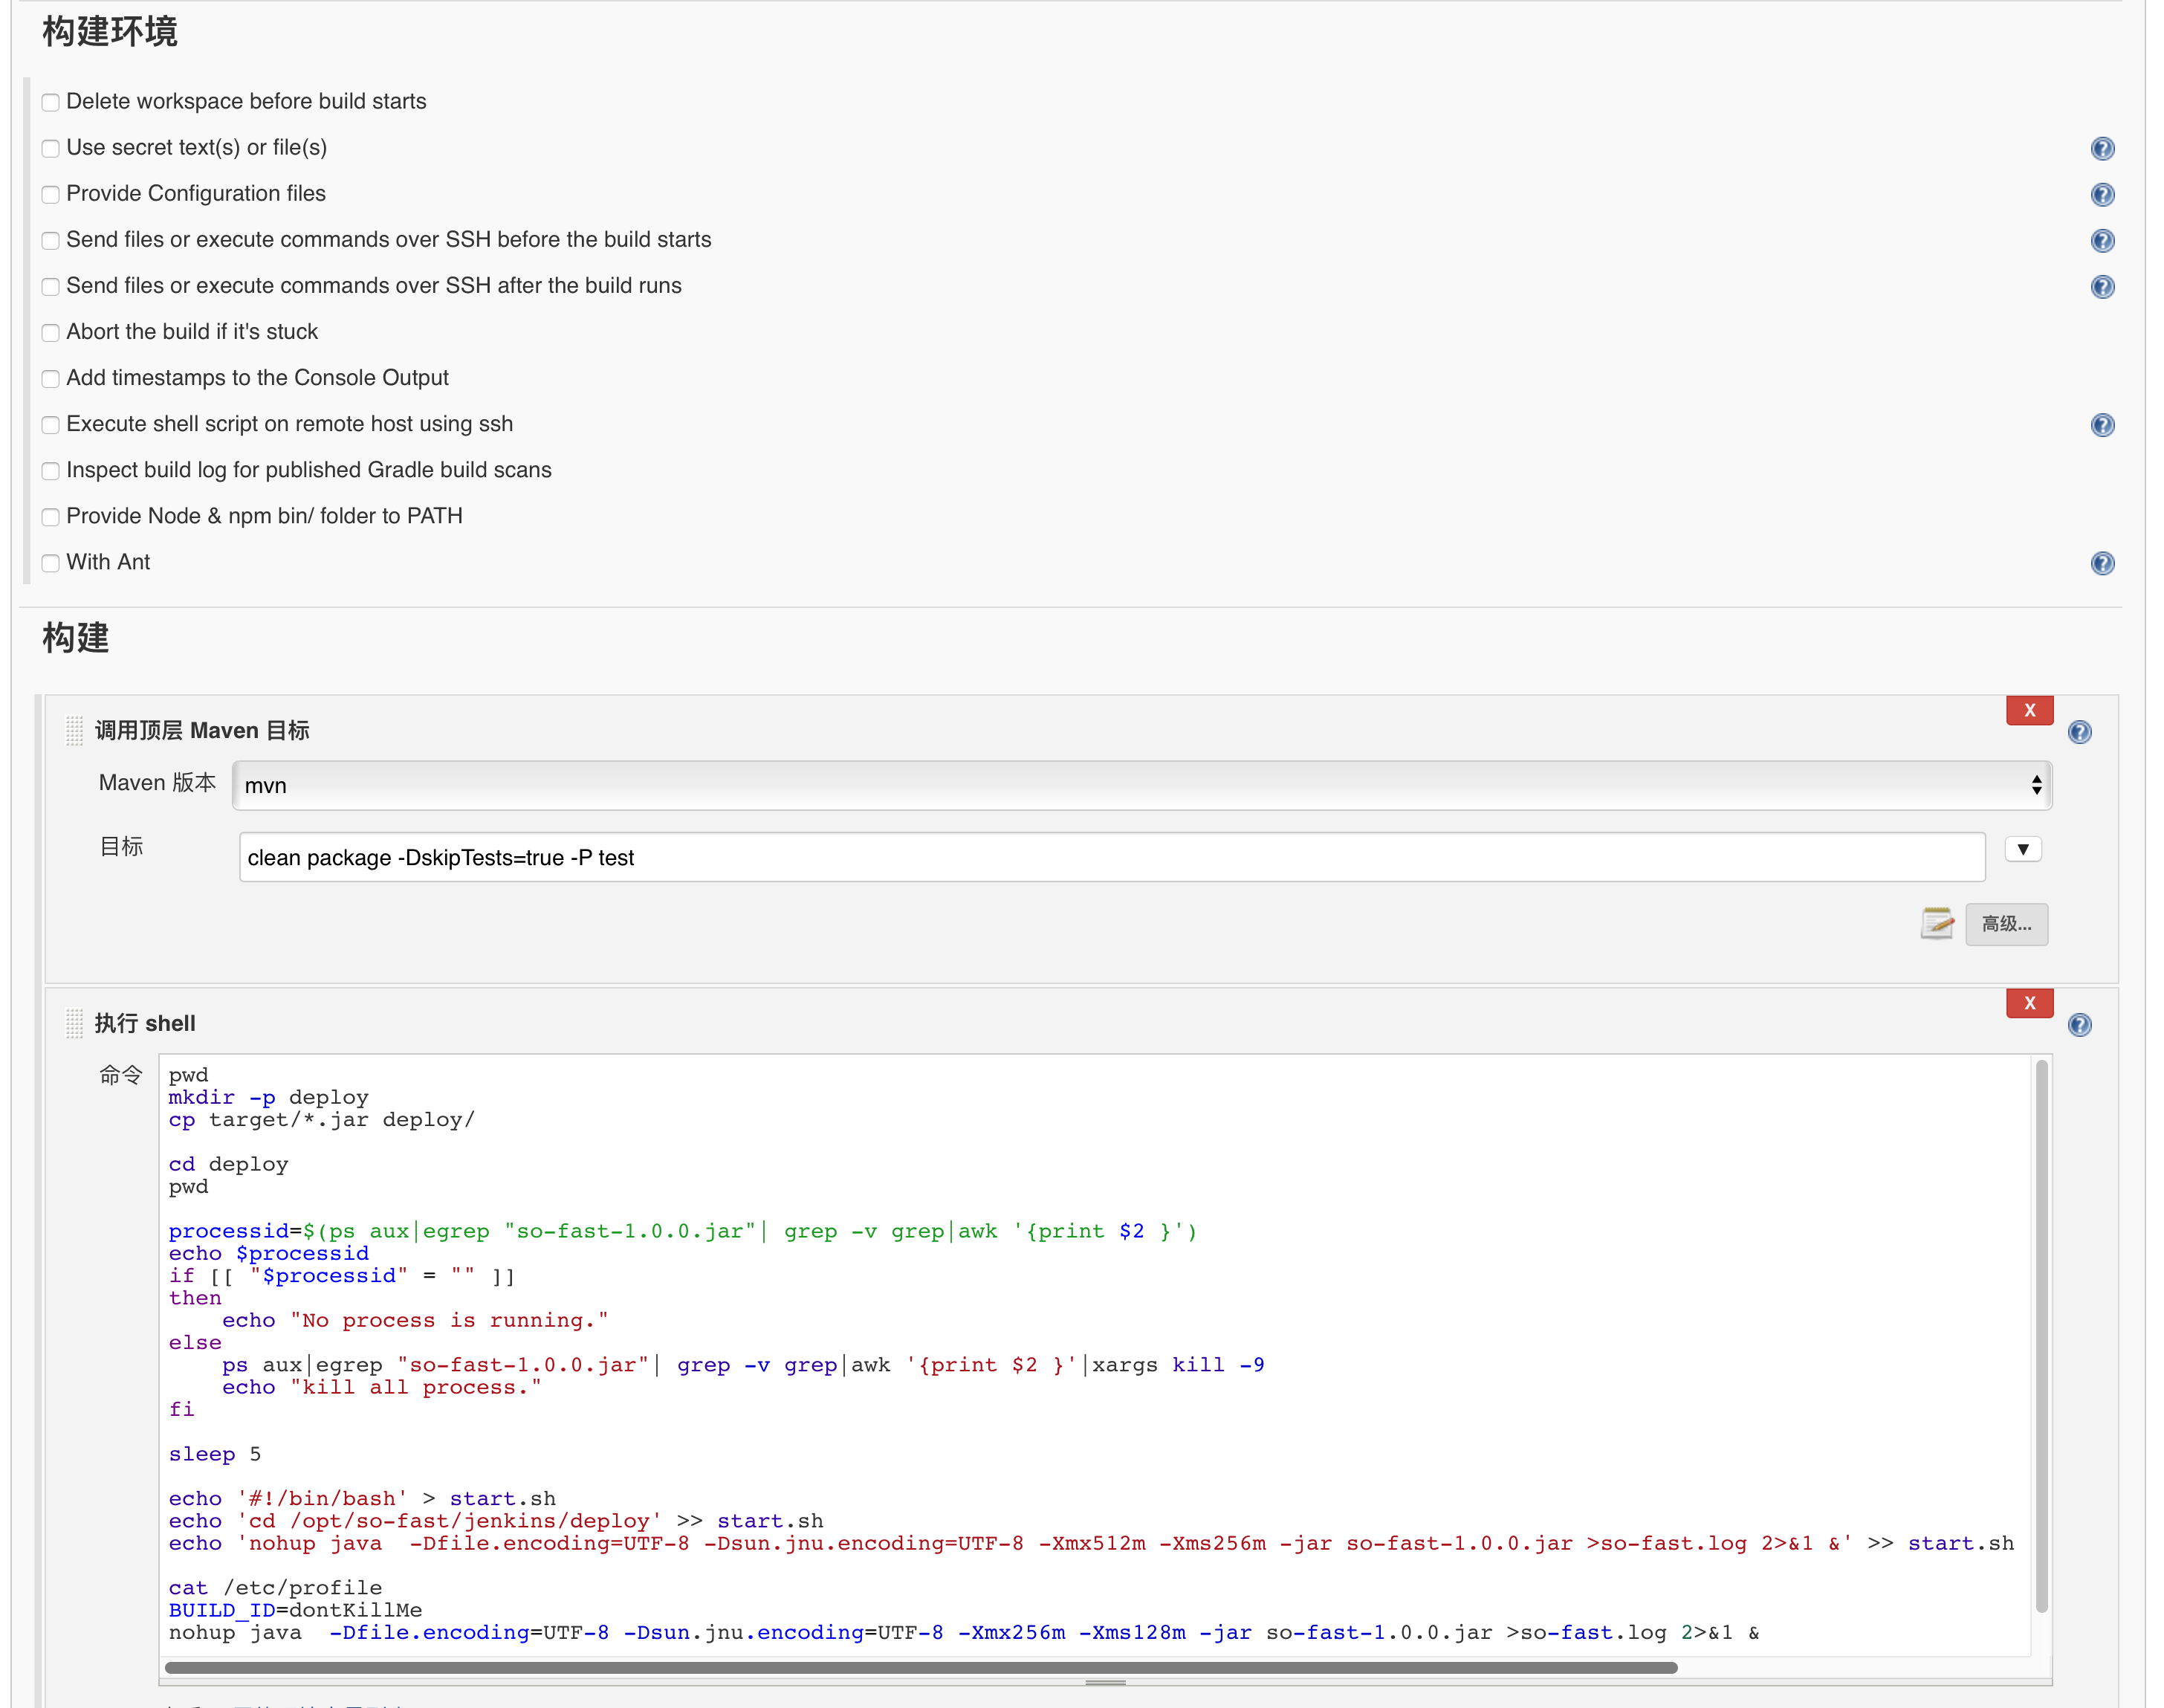
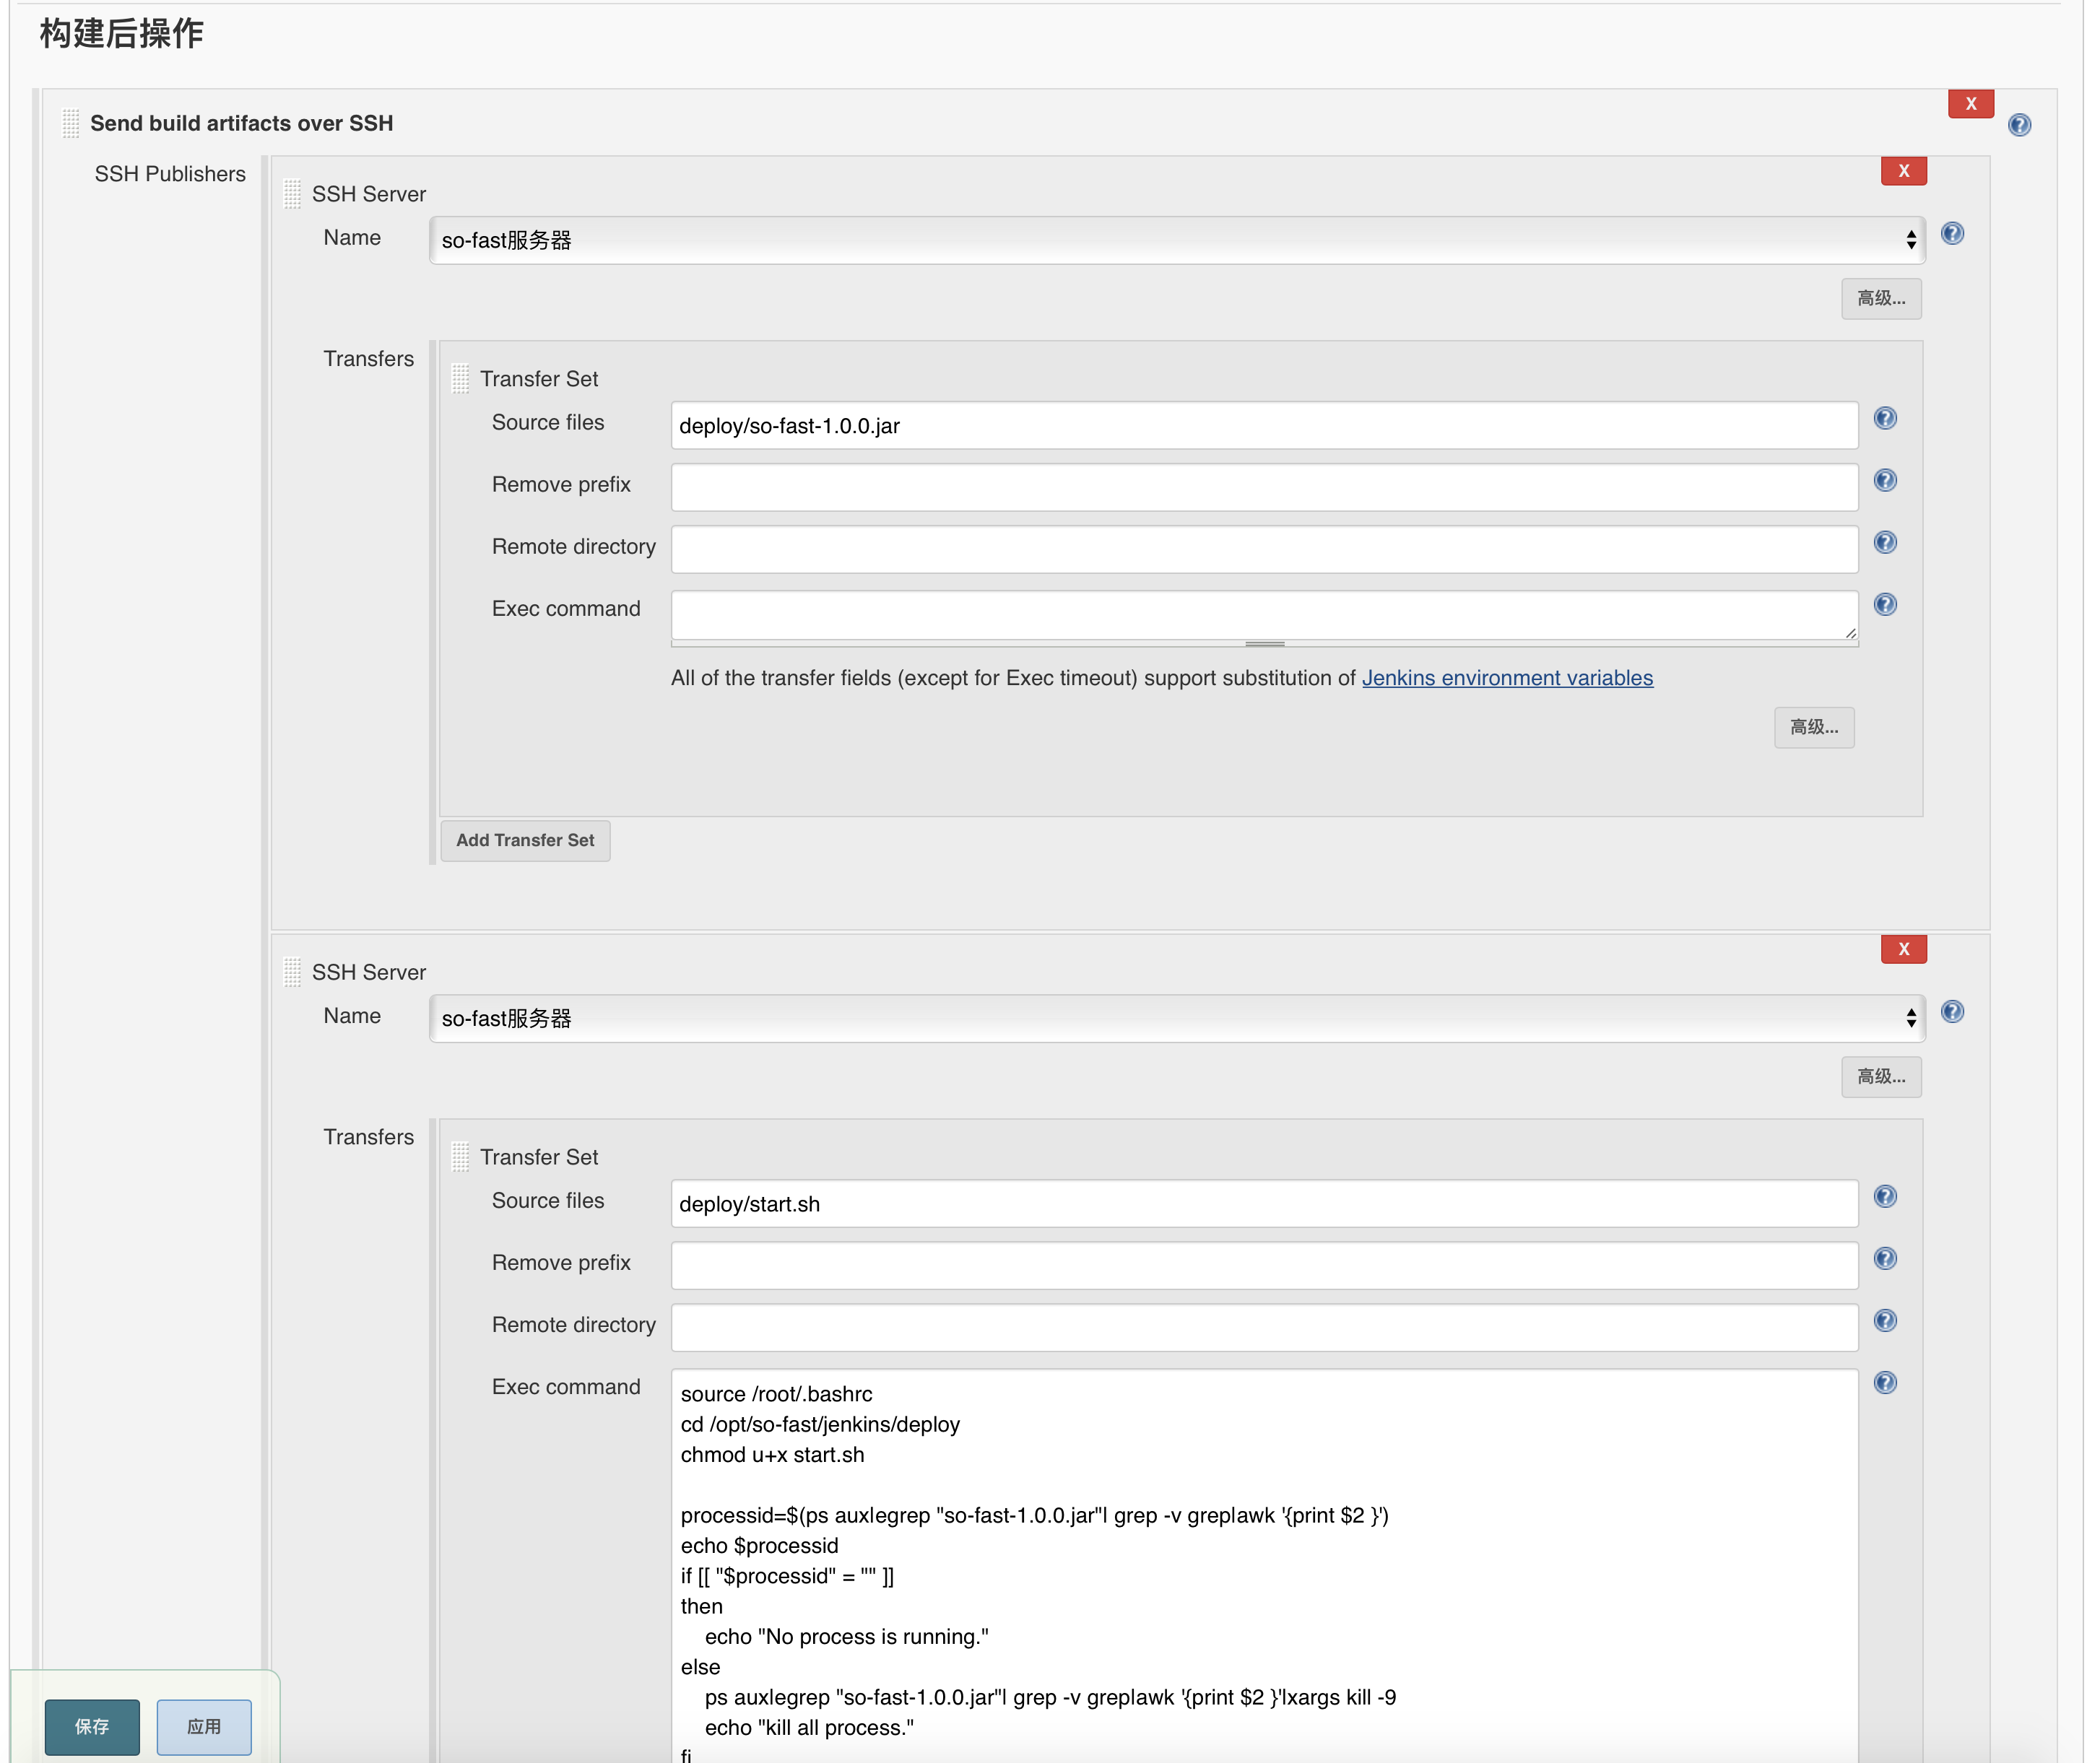
5. 启动微服务
# 编译打包测试环境
mvn clean package -DskipTests -P test
# 编译打包生产环境
#mvn clean package -DskipTests -P prod

#逐个启动服务
nohup java  -Dfile.encoding=UTF-8 -Dsun.jnu.encoding=UTF-8 -Xmx512m -Xms256m -jar so-fast-xxx.jar >> /dev/null 2>&1 &

##可以使用shell脚本批量启动服务
1
2
3
4
5
6
7
8
9
2
3
4
5
6
7
8
9
1
2
3
4
5
6
7
8
9
2
3
4
5
6
7
8
9
推荐默认使用 jar 包运行
如果想要使用 tomcat 进行 war 部署,需要进行打包修改:
1. 将 pom.xml 文件的 packaging 从 jar 修改为 war
2. 将 springboot 内置的 tomcat 容器排除
    <exclusions>
        <exclusion>
            <groupId>org.springframework.boot</groupId>
            <artifactId>spring-boot-starter-tomcat</artifactId>
        </exclusion>
    </exclusions>
1
2
3
4
5
61
2
3
4
5
6
6. 测试
可通过 nacos 的服务管理观察服务是否全部启动成功(有一定延迟),并可通过 swagger 等查看接口文档
http://x.x.x.x:port/doc.html
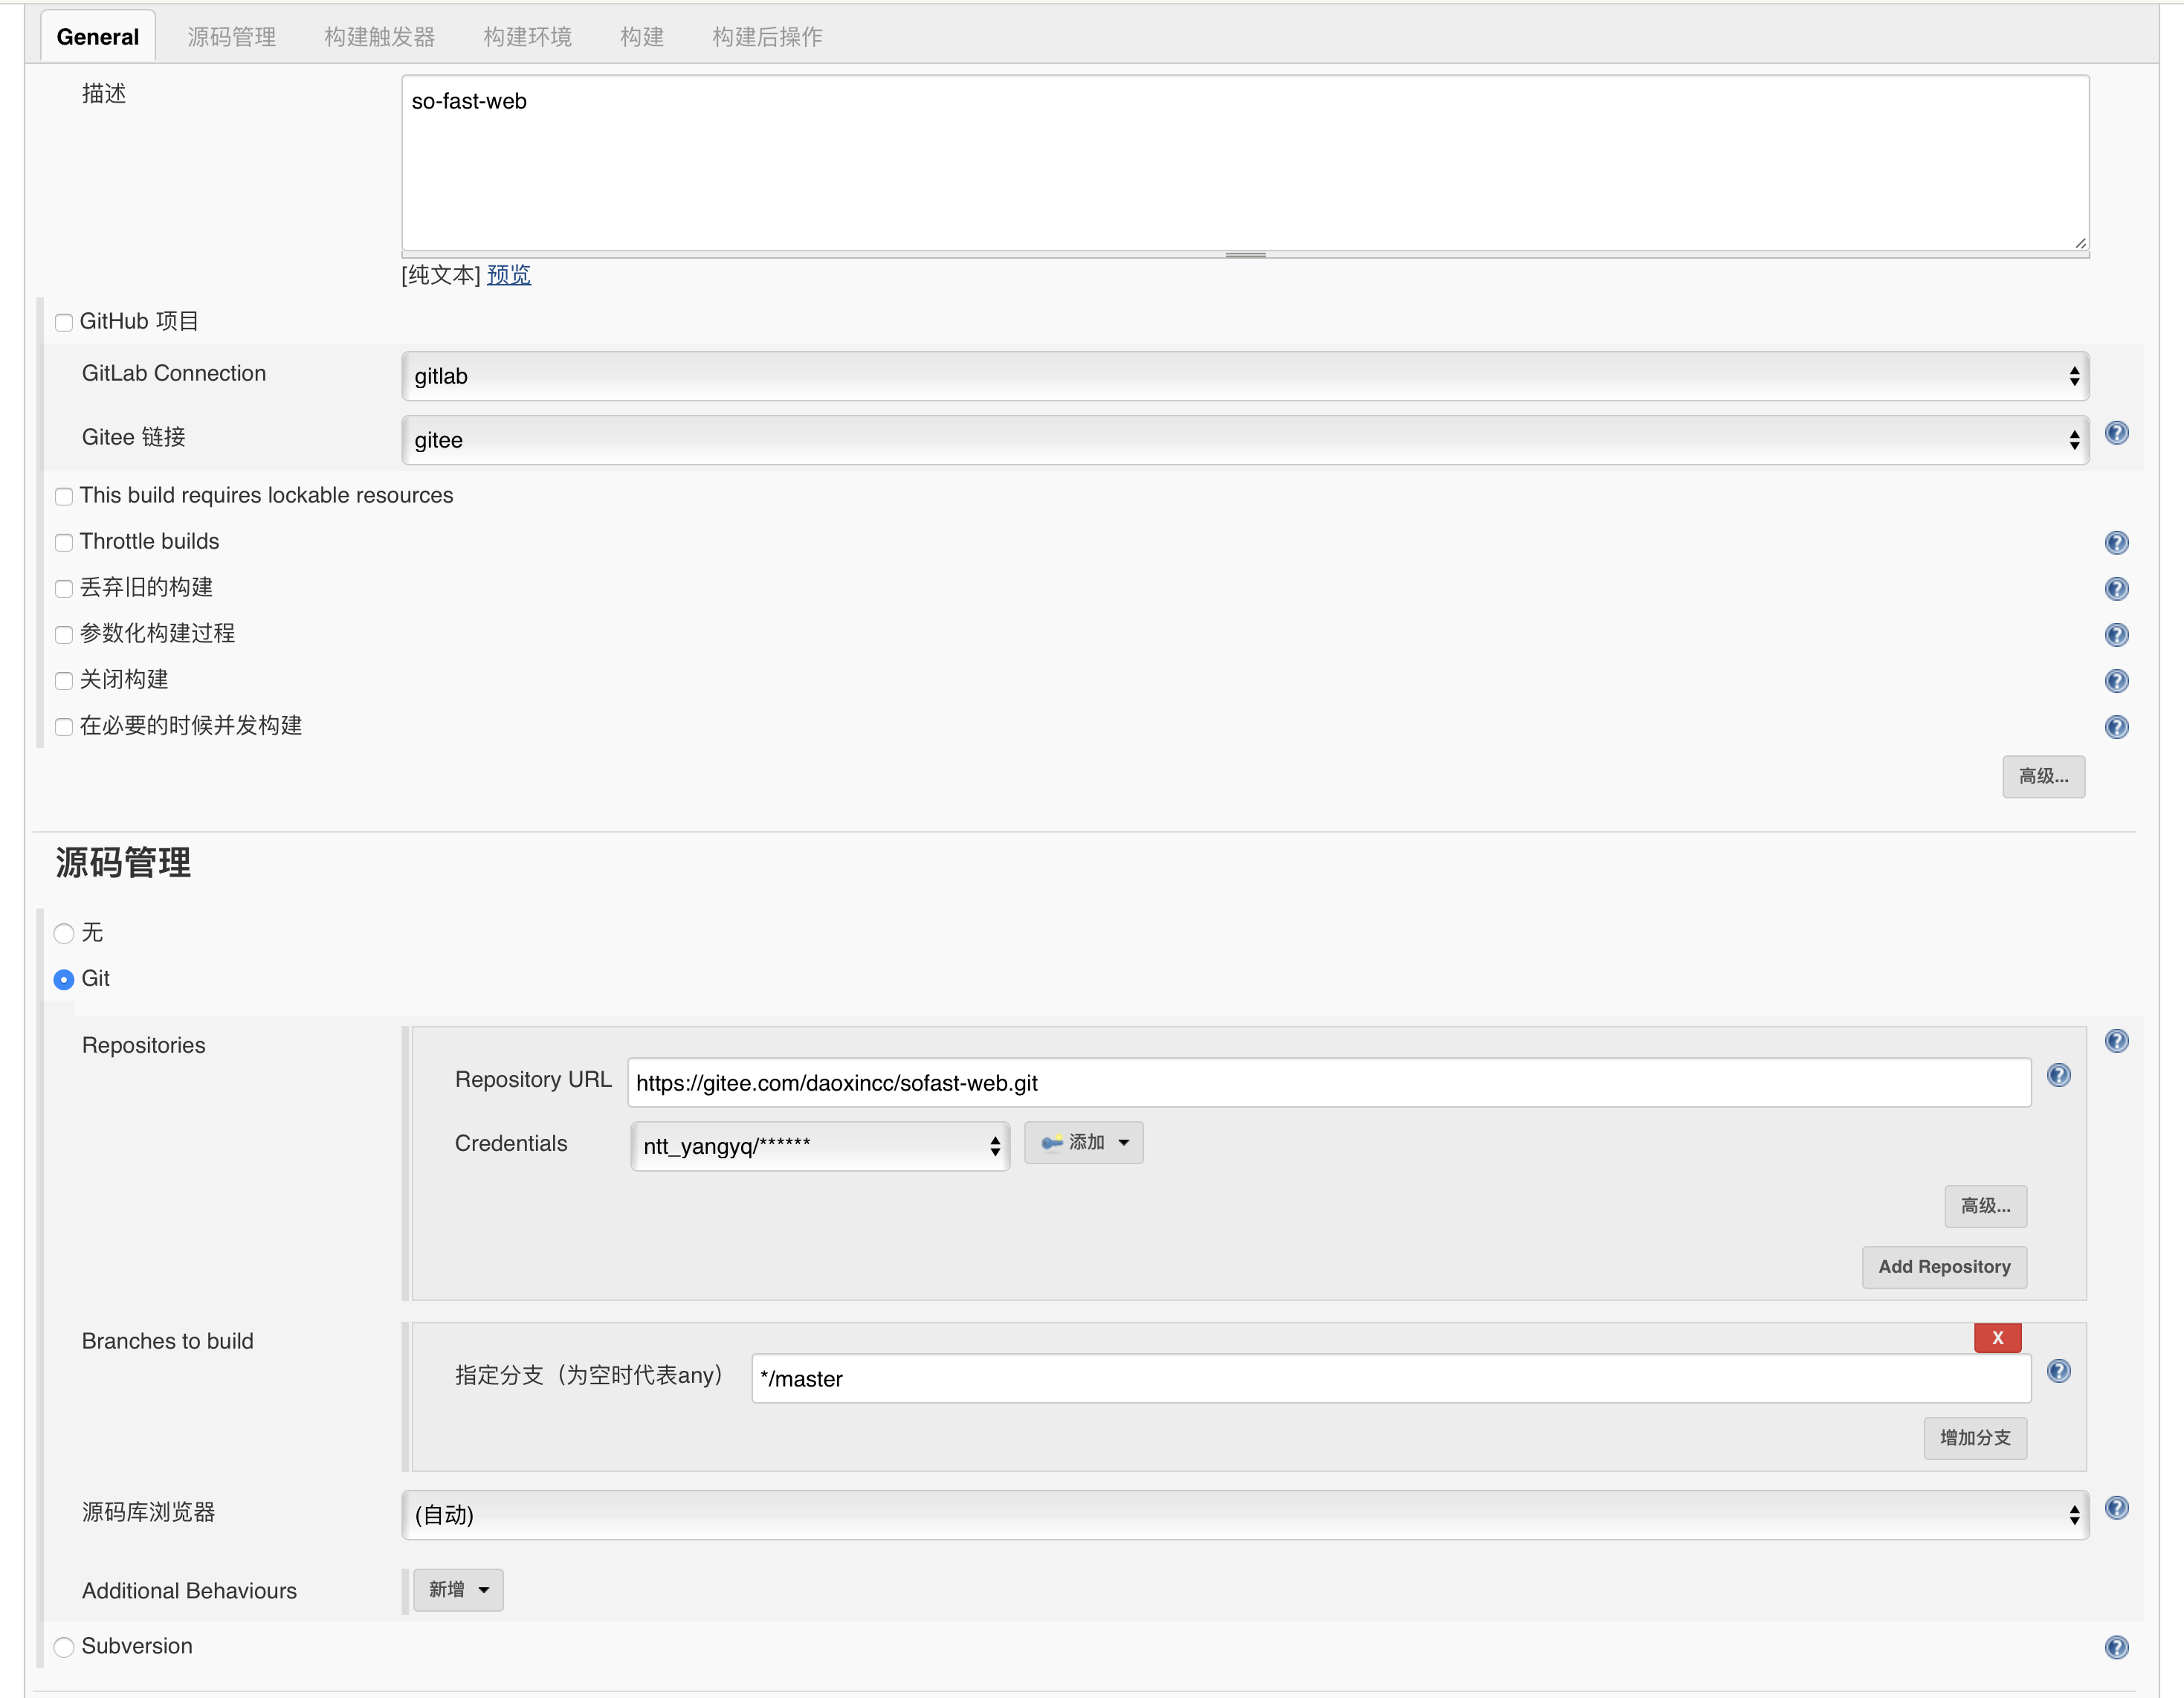
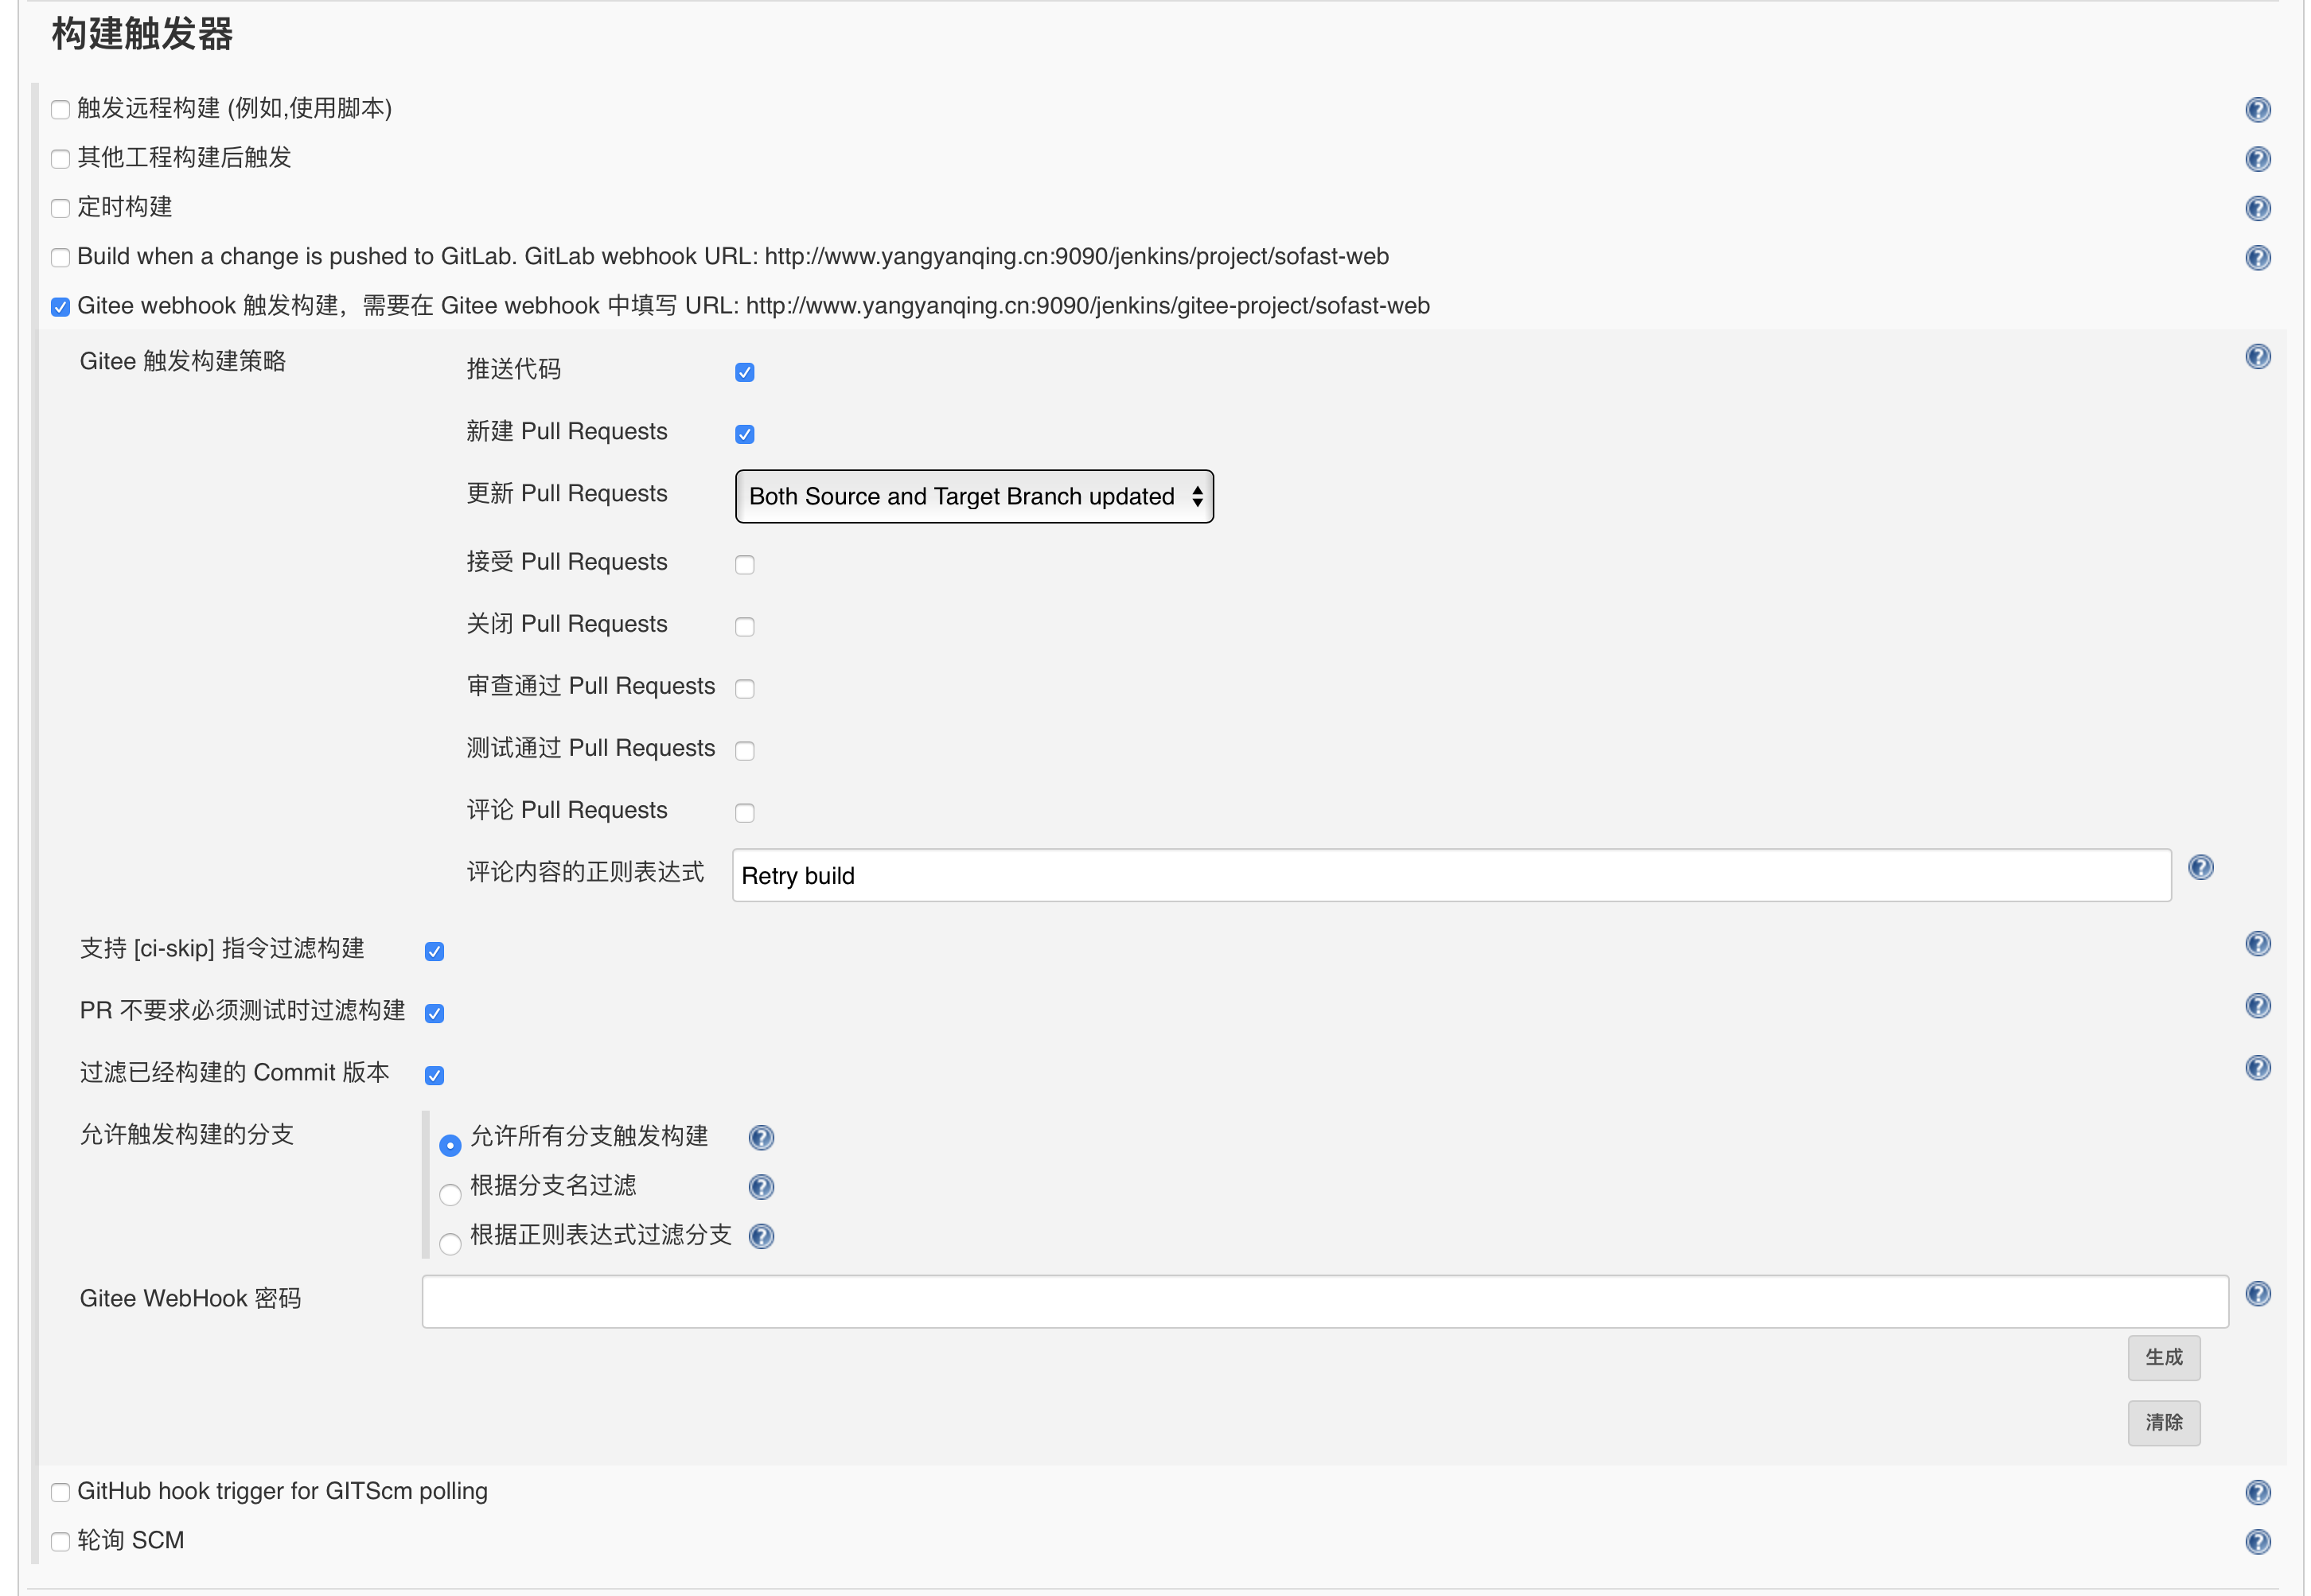
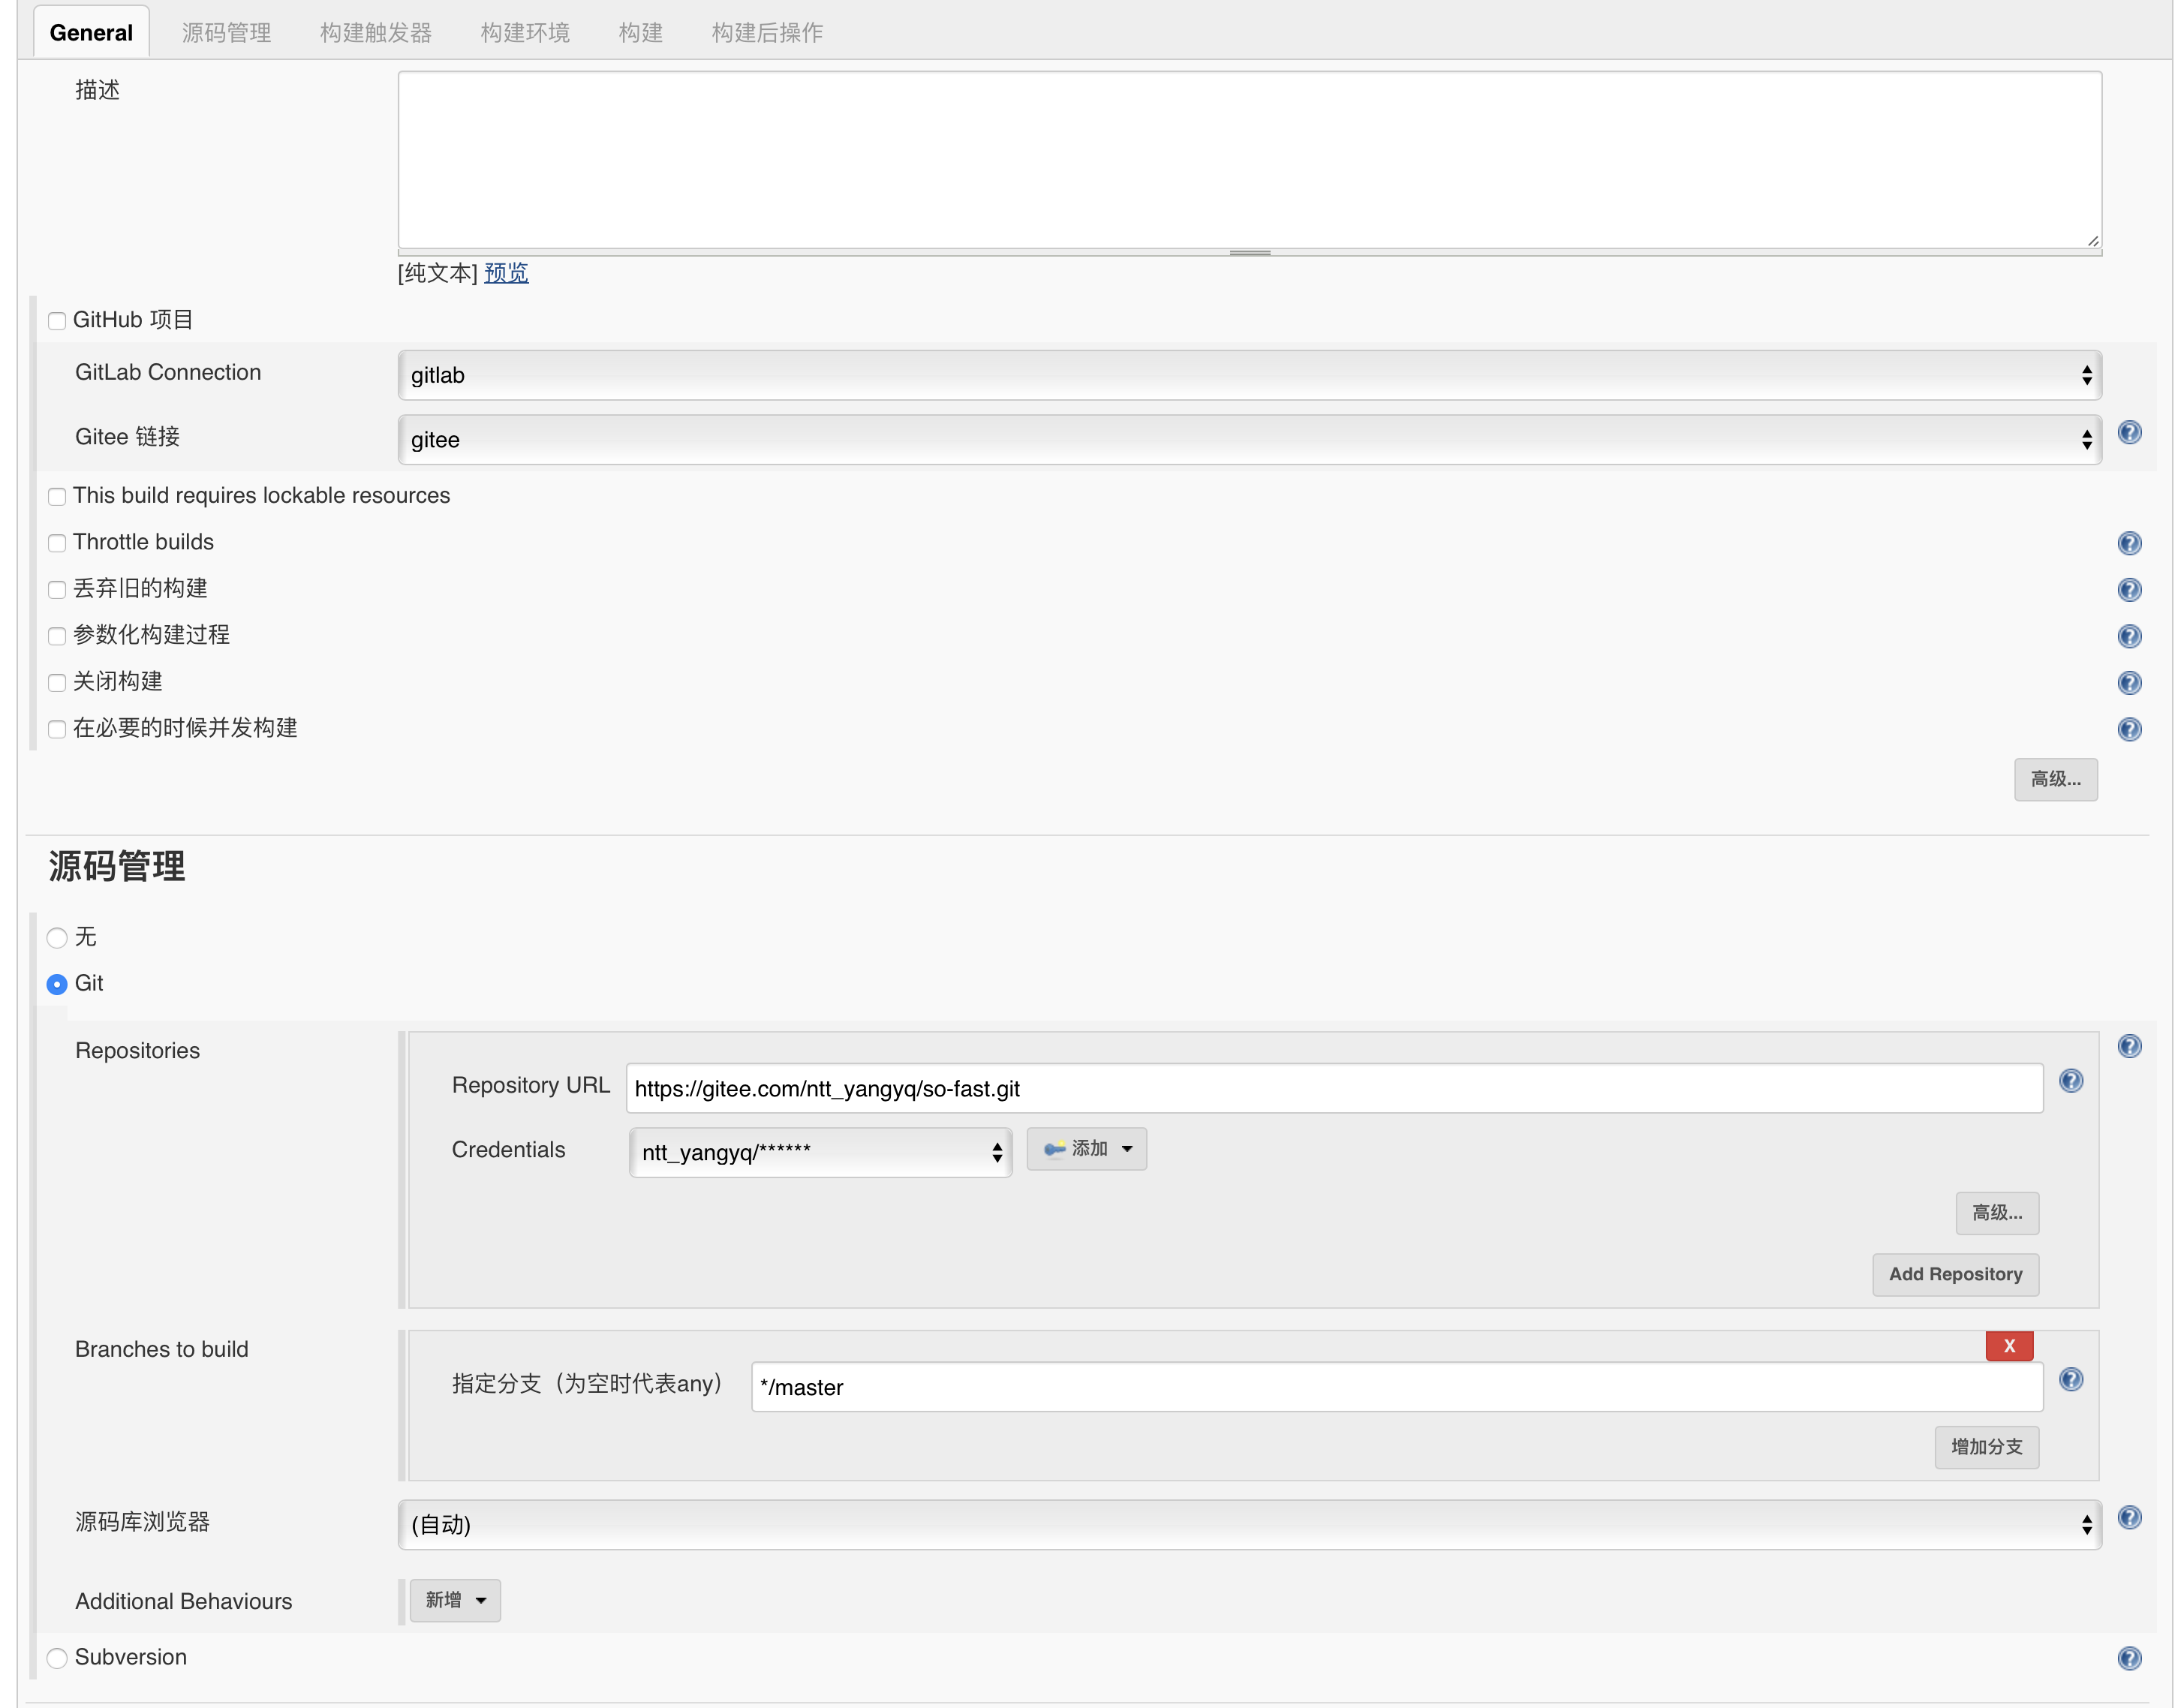
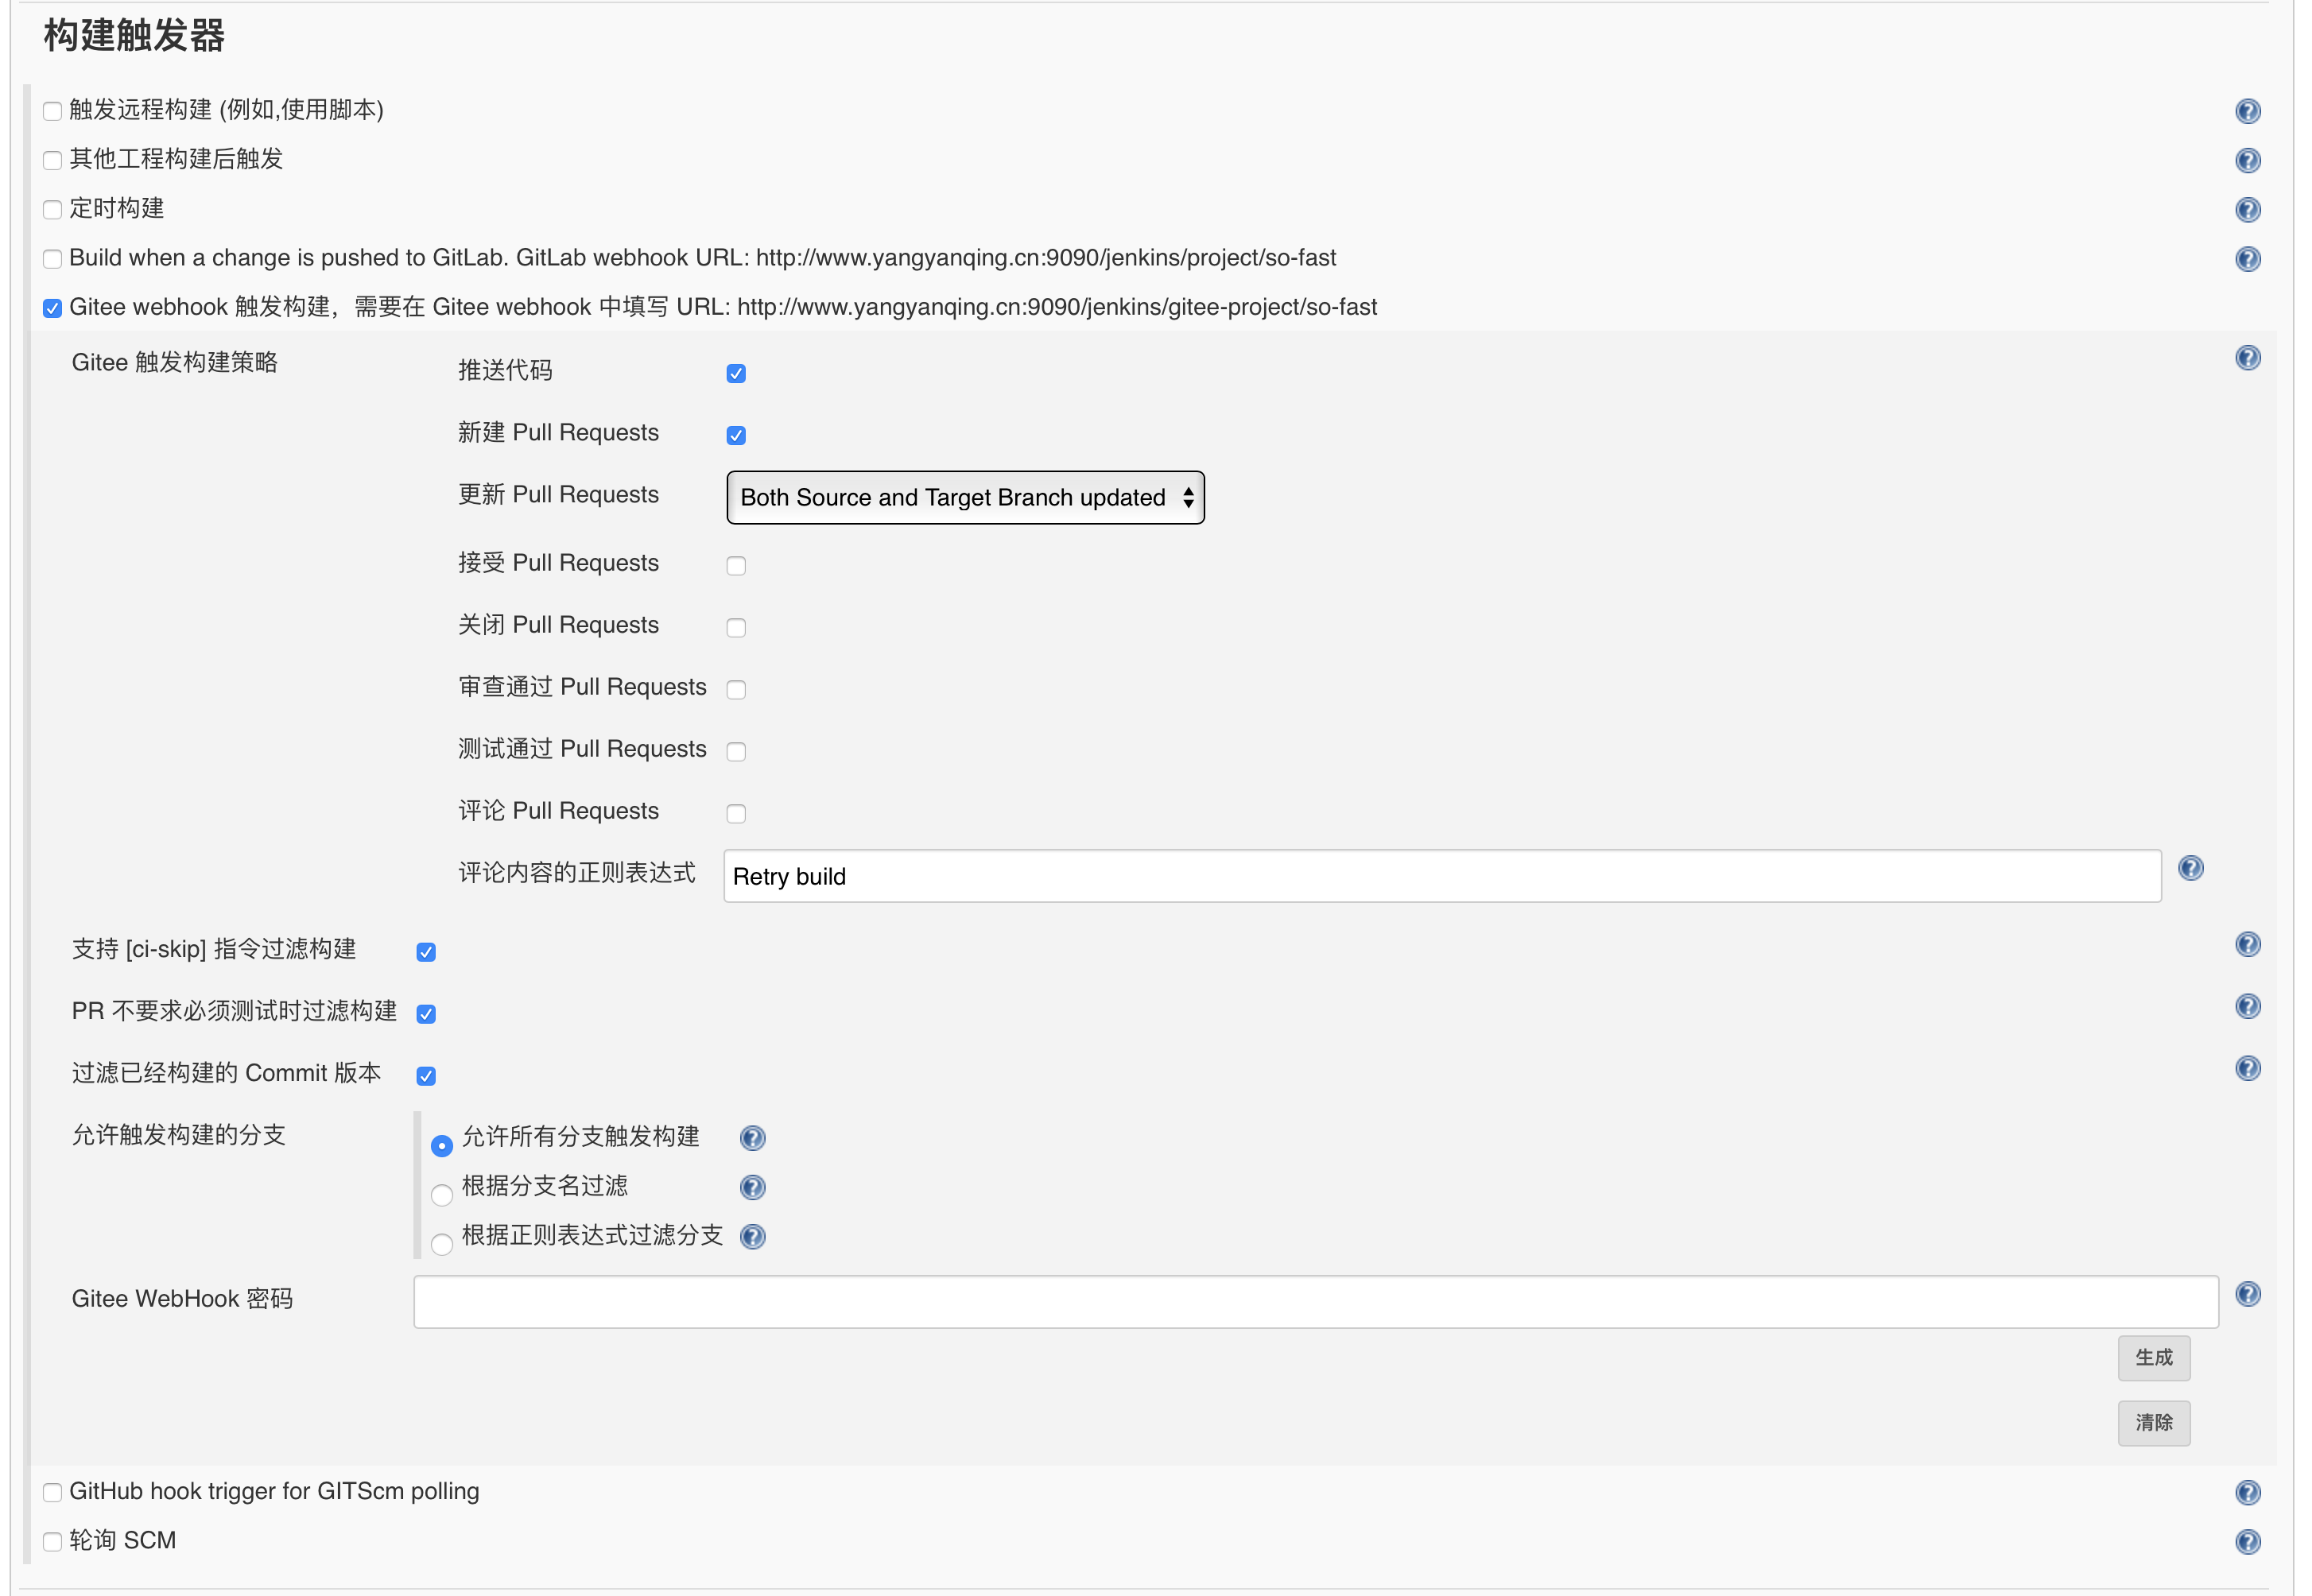
# jenkins 部署
# Jenkins 安装
具体安装参照【Jenkins 安装手顺】
# 前端部署
# 后端部署
上次更新: 2025/04/23, 09:03:53