后端开发
# 创建微服务工程
使用 sofast 框架进行微服务开发有两种模式:
- 使用源码工程进行开发【不再推荐使用】
- 基于 so-fast-cloud-dependencies 依赖管理进行开发【推荐】
# 基于 so-fast-cloud-dependencies 依赖开发
不需要下载工程源码框架,直接创建工程并添加 maven 依赖,即可轻松使用 sofast 框架进行微服务开发。
# 配置 maven 依赖
在 maven 配置文件 settings.xml 中添加私服认证配置
<server>
  <id>sofast-proxy</id>
  <username>ntt-read</username>
  <password>(Nttdata)</password>
</server>
2
3
4
5
2
3
4
5
# 创建工程
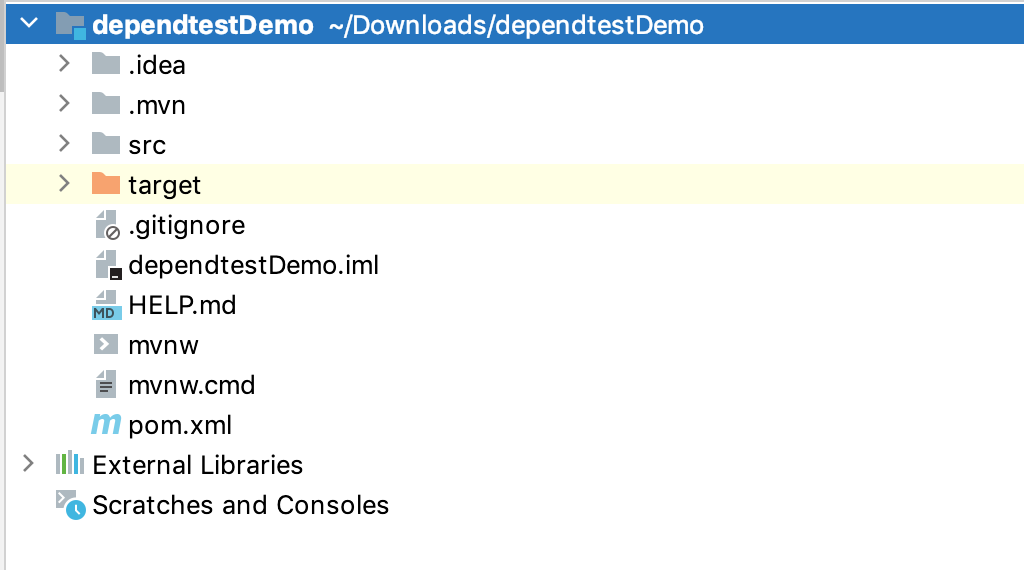
使用 intellij idea 创建一个 maven 工程,例如:dependtestDemo
# Maven 依赖
<?xml version="1.0" encoding="UTF-8"?>
<project xmlns="http://maven.apache.org/POM/4.0.0" xmlns:xsi="http://www.w3.org/2001/XMLSchema-instance"
         xsi:schemaLocation="http://maven.apache.org/POM/4.0.0 https://maven.apache.org/xsd/maven-4.0.0.xsd">
    <modelVersion>4.0.0</modelVersion>
    <groupId>com.example</groupId>
    <artifactId>demo</artifactId>
    <version>0.0.1-SNAPSHOT</version>
    <name>demo</name>
    <description>Demo project for Spring Boot</description>
    <properties>
        <java.version>1.8</java.version>
    </properties>

   <!-- 配置sofast 依赖管理 -->
    <dependencyManagement>
        <dependencies>
            <dependency>
                <groupId>com.sofast.cloud</groupId>
                <artifactId>so-fast-cloud-dependencies</artifactId>
                <version>2.2.0.RELEASE</version>
                <type>pom</type>
                <scope>import</scope>
            </dependency>
        </dependencies>
    </dependencyManagement>

    <dependencies>
          <!-- rest api开发依赖包 -->
        <dependency>
            <groupId>com.sofast.cloud</groupId>
            <artifactId>so-fast-web-starter</artifactId>
        </dependency>
    </dependencies>

    <!-- maven插件配置 -->
    <build>
        <resources>
            <resource>
                <directory>src/main/resources</directory>
                <filtering>true</filtering>
            </resource>
        </resources>

        <plugins>
            <plugin>
                <groupId>org.apache.maven.plugins</groupId>
                <artifactId>maven-compiler-plugin</artifactId>
                <version>3.2</version>
                <configuration>
                    <source>${java.version}</source>
                    <target>${java.version}</target>
                    <encoding>UTF-8</encoding>
                </configuration>
            </plugin>
        </plugins>
    </build>


    <!-- 环境区分 -->
    <profiles>
        <profile>
            <id>dev</id>
            <activation>
                <activeByDefault>true</activeByDefault>
            </activation>
            <properties>
                <profileActive>dev</profileActive>
            </properties>
        </profile>
        <profile>
            <id>test</id>
            <properties>
                <profileActive>test</profileActive>
            </properties>
        </profile>
        <profile>
            <id>prod</id>
            <properties>
                <profileActive>prod</profileActive>
            </properties>
        </profile>
    </profiles>

    <!--指定代理私服镜像-->
    <repositories>
        <repository>
            <id>sofast-proxy</id>
            <url>http://101.133.164.217:8091/repository/maven-public/</url>
            <snapshots>
                <enabled>true</enabled>
                <!--快照更新策略-->
                <updatePolicy>always</updatePolicy>
            </snapshots>
        </repository>
    </repositories>

</project>
2
3
4
5
6
7
8
9
10
11
12
13
14
15
16
17
18
19
20
21
22
23
24
25
26
27
28
29
30
31
32
33
34
35
36
37
38
39
40
41
42
43
44
45
46
47
48
49
50
51
52
53
54
55
56
57
58
59
60
61
62
63
64
65
66
67
68
69
70
71
72
73
74
75
76
77
78
79
80
81
82
83
84
85
86
87
88
89
90
91
92
93
94
95
96
97
2
3
4
5
6
7
8
9
10
11
12
13
14
15
16
17
18
19
20
21
22
23
24
25
26
27
28
29
30
31
32
33
34
35
36
37
38
39
40
41
42
43
44
45
46
47
48
49
50
51
52
53
54
55
56
57
58
59
60
61
62
63
64
65
66
67
68
69
70
71
72
73
74
75
76
77
78
79
80
81
82
83
84
85
86
87
88
89
90
91
92
93
94
95
96
97
# 配置 hosts
在开发时,为了防止因服务器 IP 变更而导致 maven 私服地址变化,特意通过 hosts 配置了 IP 和私有域名的映射。
配置如下(hosts 文件位置:linux 在 /etc/hosts;windowns 在 C:¥¥Windows¥System32¥drivers¥etc¥hosts
101.133.164.217 so-fast
101.133.164.217 sofast.com
101.133.164.217 maven.sofast
2
3
2
3
然而,现在域名服务商在逐步禁止私有域名的使用,因此,后续版本我们将取消 hosts 配置,直接使用 IP 地址的方式, 开发人员遇到无法访问时,可将 pom.xml 中的 sofast-proxy 标签对应的域名换成上述的 ip 地址。
# 新建启动文件
创建启动文件 XxxApplication.java
/**
 * xx业务服务
 * @Description: TODO
 * @Date : 2021/6/17 18:53 PM
 * @Author : NCIT
 */
@EnableSwagger2
@EnableSolFeign
@EnableDiscoveryClient
@SpringBootApplication(exclude = DruidDataSourceAutoConfigure.class)
public class XxxApplication {
    public static void main(String[] args) {
        SpringApplication.run(XxxApplication.class, args);
    }
}
2
3
4
5
6
7
8
9
10
11
12
13
14
15
2
3
4
5
6
7
8
9
10
11
12
13
14
15
@EnableSwagger2 表示要启用 swagger api,swagger 的扫描路径需要在 bootstrap.yml 中进行配置
@EnableSolFeign 表示要启用 Feign,默认扫描路径为「com.sofast.cloud」,如果自定义包路径,请配置 basePackages 参数
@EnableDiscoveryClient:服务发现客户端
@SpringBootApplication (exclude = DruidDataSourceAutoConfigure.class) 表示不使用默认的 Druid 数据源加载,启用 sofast 框架自定义动态数据源配置
常规微服务需要同时开启以上 4 个注解。
注意:sofast 中使用的 orm 框架为 mybatis-plus,默认的 mapper 接口扫描路径为:@MapperScan ({"com.sofast.cloud..mapper."}),如果自定义开发时,创建了其他前缀包名,请在启动文件配置自定义 MapperScan 路径,包名规划请尽可能遵守 sofast 框架规范,减少参数设置
# 开发
创建目录结构以及开发,请参照开发规范 (opens new window),并推荐使用代码生成器直接进行通用代码框架生成,详细请参照下一章节代码生成器 (opens new window)
# 配置文件
│   │   └── resources
│   │       ├── application-dev.yml
│   │       ├── application-test.yml
│   │       ├── application-prod.yml
│   │       ├── banner.txt
│   │       ├── bootstrap.yml
│   │       ├── i18n
│   │       │   ├── messages.properties
│   │       │   └── messages_zh_CN.properties
│   │       ├── logback.xml
2
3
4
5
6
7
8
9
10
2
3
4
5
6
7
8
9
10
resources 目录下需要包含以下资源相关文件
application-xxx.yml 是各环境的自定义配置,需要开发者自行修改(目前所有配置文件均迁移到 nacos 配置中心)
bootstrap.yml 是通用配置文件,一般情况无需修改
i18n 是国际化资源文件
logback.xml 是日志打印配置文件
添加 bootstrap.yml 配置文件【必要文件】
# 修改为自己服务的端口号
server:
  port: 9044
spring:
  application:
    name: @artifactId@
  profiles:
    active: @profileActive@

  cloud:
    nacos:
      discovery:
        # 服务注册地址
        server-addr: ${NACOS_HOST:localhost}:${NACOS_PORT:8848}
        group: SO_FAST_GROUP
      config:
        # 配置中心地址
        server-addr: ${spring.cloud.nacos.discovery.server-addr}
        # 配置文件格式
        file-extension: yml
        # 共享配置
        group: SO_FAST_GROUP
        shared-configs[0]:
          data-id: application-${spring.profiles.active}.${spring.cloud.nacos.config.file-extension}
          group: SO_FAST_GROUP
          refresh: true

#swagger配置(修改为自己的包名)
swagger:
  basePackage: com.sofast.cloud.test.demo

# 利用info端点,加入版本等信息(需要在pom中配置一下信息才可以使用)
#info:
#  versin: @project.version@
#  name: @project.artifactId@
#  group: @project.groupId@
#  description: @project.description@
#  #还可以自定义信息
#  author: NCIT.1SOL
2
3
4
5
6
7
8
9
10
11
12
13
14
15
16
17
18
19
20
21
22
23
24
25
26
27
28
29
30
31
32
33
34
35
36
37
38
39
2
3
4
5
6
7
8
9
10
11
12
13
14
15
16
17
18
19
20
21
22
23
24
25
26
27
28
29
30
31
32
33
34
35
36
37
38
39
下面对 application-dev.yml 配置详细介绍:
########### 本地开发用环境 ###############

# 数据源配置
spring:
  datasource:
    type: com.alibaba.druid.pool.DruidDataSource
    driverClassName: com.mysql.cj.jdbc.Driver
    druid:
      webStatFilter:
        enabled: true
        exclusions: "*.js,*.woff,*.woff2,*.gif,*.jpg,*.png,*.css,*.ico,/druid/*,/v2/api-docs,/swagger*,/error_404"
      statViewServlet:
        enabled: true
        # 设置白名单,不填则允许所有访问
        allow:
        url-pattern: /druid/*
        # 控制台管理用户名和密码
        login-username: sofast
        login-password: sofast

    dynamic:
      druid:
        # 初始连接数
        initialSize: 5
        # 最小连接池数量
        minIdle: 10
        # 最大连接池数量
        maxActive: 20
        # 配置获取连接等待超时的时间
        maxWait: 60000
        # 配置间隔多久才进行一次检测,检测需要关闭的空闲连接,单位是毫秒
        timeBetweenEvictionRunsMillis: 60000
        # 配置一个连接在池中最小生存的时间,单位是毫秒
        minEvictableIdleTimeMillis: 300000
        # 配置一个连接在池中最大生存的时间,单位是毫秒
        maxEvictableIdleTimeMillis: 900000
        # 配置检测连接是否有效
        validationQuery: SELECT 1 FROM DUAL
        testWhileIdle: true
        testOnBorrow: false
        testOnReturn: false
      filter:
        stat:
          enabled: true
          # 慢SQL记录
          log-slow-sql: true
          slow-sql-millis: 1000
          merge-sql: true
        wall:
          config:
            multi-statement-allow: true
      datasource:
        # 主库数据源
        master:
          url: jdbc:mysql://ncit.media.com:3306/tenant-sf-system?useUnicode=true&characterEncoding=utf8&zeroDateTimeBehavior=convertToNull&useSSL=true&serverTimezone=GMT%2B8
          username: ENC(ZXWwnvHQB6JFW3vLii1p4U1VlYUuENL1szoreuhoqaAbmEKSDbtzqk7OHoimwWkDWJOtqzVx78eEg0wAmCuVRg==)
          password: ENC(XwwjMe4aUDTGR/OfIh5PXHvWlSDI7zVinVUNu3Wgjl0nUvcWarN1WnG/zmXIVifjd/v8yi33Mo0pytU2o7222w==)
        # 从库数据源

  redis:
    # 地址
    host: ncit.media.com
    port: 6379
    # 密码
    password: Ncit2017
    # 连接超时时间
    timeout: 15s
    jedis:
      pool:
        # 连接池中的最小空闲连接
        min-idle: 3
        # 连接池中的最大空闲连接
        max-idle: 10
        # 连接池的最大数据库连接数
        max-active: 50
        # #连接池最大阻塞等待时间(使用负值表示没有限制)
        max-wait: -1ms
    database: 6

  # 服务模块
  devtools:
  restart:
    # 热部署开关
    enabled: true

#mybatis-plus配置
mybatis-plus:
  # 自定义xml文件路径
  mapper-locations: classpath*:mapper/**/*Mapper.xml
  # MyBaits 别名包扫描路径,通过该属性可以给包中的类注册别名,注册后在 Mapper 对应的 XML 文件中可以直接使用类名,而不用使用全限定的类名(即 XML 中调用的时候不用包含包名)
  type-aliases-package: com.sofast.cloud.**.entity, com.sofast.cloud.**.domain.**
  # mybatis执行器 该执行器类型会复用预处理语句(PreparedStatement)
  executor-type: reuse

  # 控制台打印sql
  configuration:
    log-impl: org.apache.ibatis.logging.stdout.StdOutImpl

  global-config:
    #是否控制台 print mybatis-plus 的 LOGO
    banner: false

    db-config:
      select-strategy: not_null
      # 逻辑删除配置
      logic-delete-value: 1
      logic-not-delete-value: 0
      logic-delete-field: deleteFlg


#安全配置
sofast:
  log:
    operator:
      # 配置审计日志的拦截范围
      types: insert,update,delete

# 防止XSS攻击
xss:
  # 过滤开关
  enabled: false
  # 排除链接(多个用逗号分隔)
  excludes:
  # 匹配链接
  urlPatterns: /*
2
3
4
5
6
7
8
9
10
11
12
13
14
15
16
17
18
19
20
21
22
23
24
25
26
27
28
29
30
31
32
33
34
35
36
37
38
39
40
41
42
43
44
45
46
47
48
49
50
51
52
53
54
55
56
57
58
59
60
61
62
63
64
65
66
67
68
69
70
71
72
73
74
75
76
77
78
79
80
81
82
83
84
85
86
87
88
89
90
91
92
93
94
95
96
97
98
99
100
101
102
103
104
105
106
107
108
109
110
111
112
113
114
115
116
117
118
119
120
121
122
123
124
125
数据库、redis 请修改为自己的服务器地址
mybatis-plus 的配置,也请根据自己的包路径进行对应修改
# 启动服务
在启动服务之前,请先保证 nacos 已经正确运行。
直接使用 IDE 启动为服务,或者使用 maven 打包后,使用命令启动服务,观察 nacos 中服务是否注册成功。
通过该链接 http://localhost:9044/doc.html 可以查看 swagger api doc。
# 常见问题
1. 关于数据源
sofast 框架默认使用动态数据源插件,因此在启动类上,我们需要排除默认的 DruidDataSourceAutoConfigure 配置类,而使用动态数据源插件携带的配置类;在配置文件中,必须按照动态数据源的配置方式,配置 jdbc 连接,否则启动会报错。
如果该微服务中不需要连接数据库和 redis,那么请在 pom.xml 文件中将数据库依赖包排除。例如:
<dependency>
    <groupId>com.sofast.cloud</groupId>
    <artifactId>so-fast-web-starter</artifactId>
    <exclusions>
        <!-- 排除数据库 -->
        <exclusion>
            <groupId>com.sofast.cloud</groupId>
            <artifactId>so-fast-mybatis-starter</artifactId>
        </exclusion>
        <!-- 排除数据库 -->
        <exclusion>
            <groupId>com.sofast.cloud</groupId>
            <artifactId>so-fast-ds-starter</artifactId>
        </exclusion>
        <!-- 排除redis -->
        <exclusion>
            <groupId>com.sofast.cloud</groupId>
            <artifactId>so-fast-redis-starter</artifactId>
        </exclusion>
    </exclusions>
</dependency>
2
3
4
5
6
7
8
9
10
11
12
13
14
15
16
17
18
19
20
21
2
3
4
5
6
7
8
9
10
11
12
13
14
15
16
17
18
19
20
21
2. 关于微服务路由配置
微服务开发完成后,需要通过网关进行统一转发访问,生产环境不允许直接暴露微服务端口;但是在本地开发时,可以直接访问微服务 api。
不通过网关代理,在微服务中是无法获取 token 及用户信息的,因此只能作为本机开发调试使用。
测试和生产环境,需要在 gateway 中配置动态路由,才可以通过网关来访问微服务,动态路由的配置可以参考网关中的示例。
3. 关于审计日志
sofast 框架默认提供了审计日志模块,通过数据库来记录日志信息,如果要使用该功能,那么需要在需要记录日志的方法上添加如下注解:
@LogOperator(title = "请填写方法的描述信息", type = Constants.SELECT_OPERATOR)
该注解有两个必填参数,一个 title,是描述这个方法是做什么的,一个 type,是标示这个方法的类别(类别有 6 种:增删改查,上传和下载)
4. 关于 swagger
sofast 框架默认提供 swagger api doc,需要在启动类上加入注解 @EnableSwagger2,以及在 bootstrap.yml 文件中配置扫描的包路径
#swagger配置(修改为自己的包名)
swagger:
  basePackage: com.sofast.cloud.test.demo
2
3
2
3
服务启动后,通过 http://ip:port/doc.html 地址就可以访问 swagger
# 代码生成器
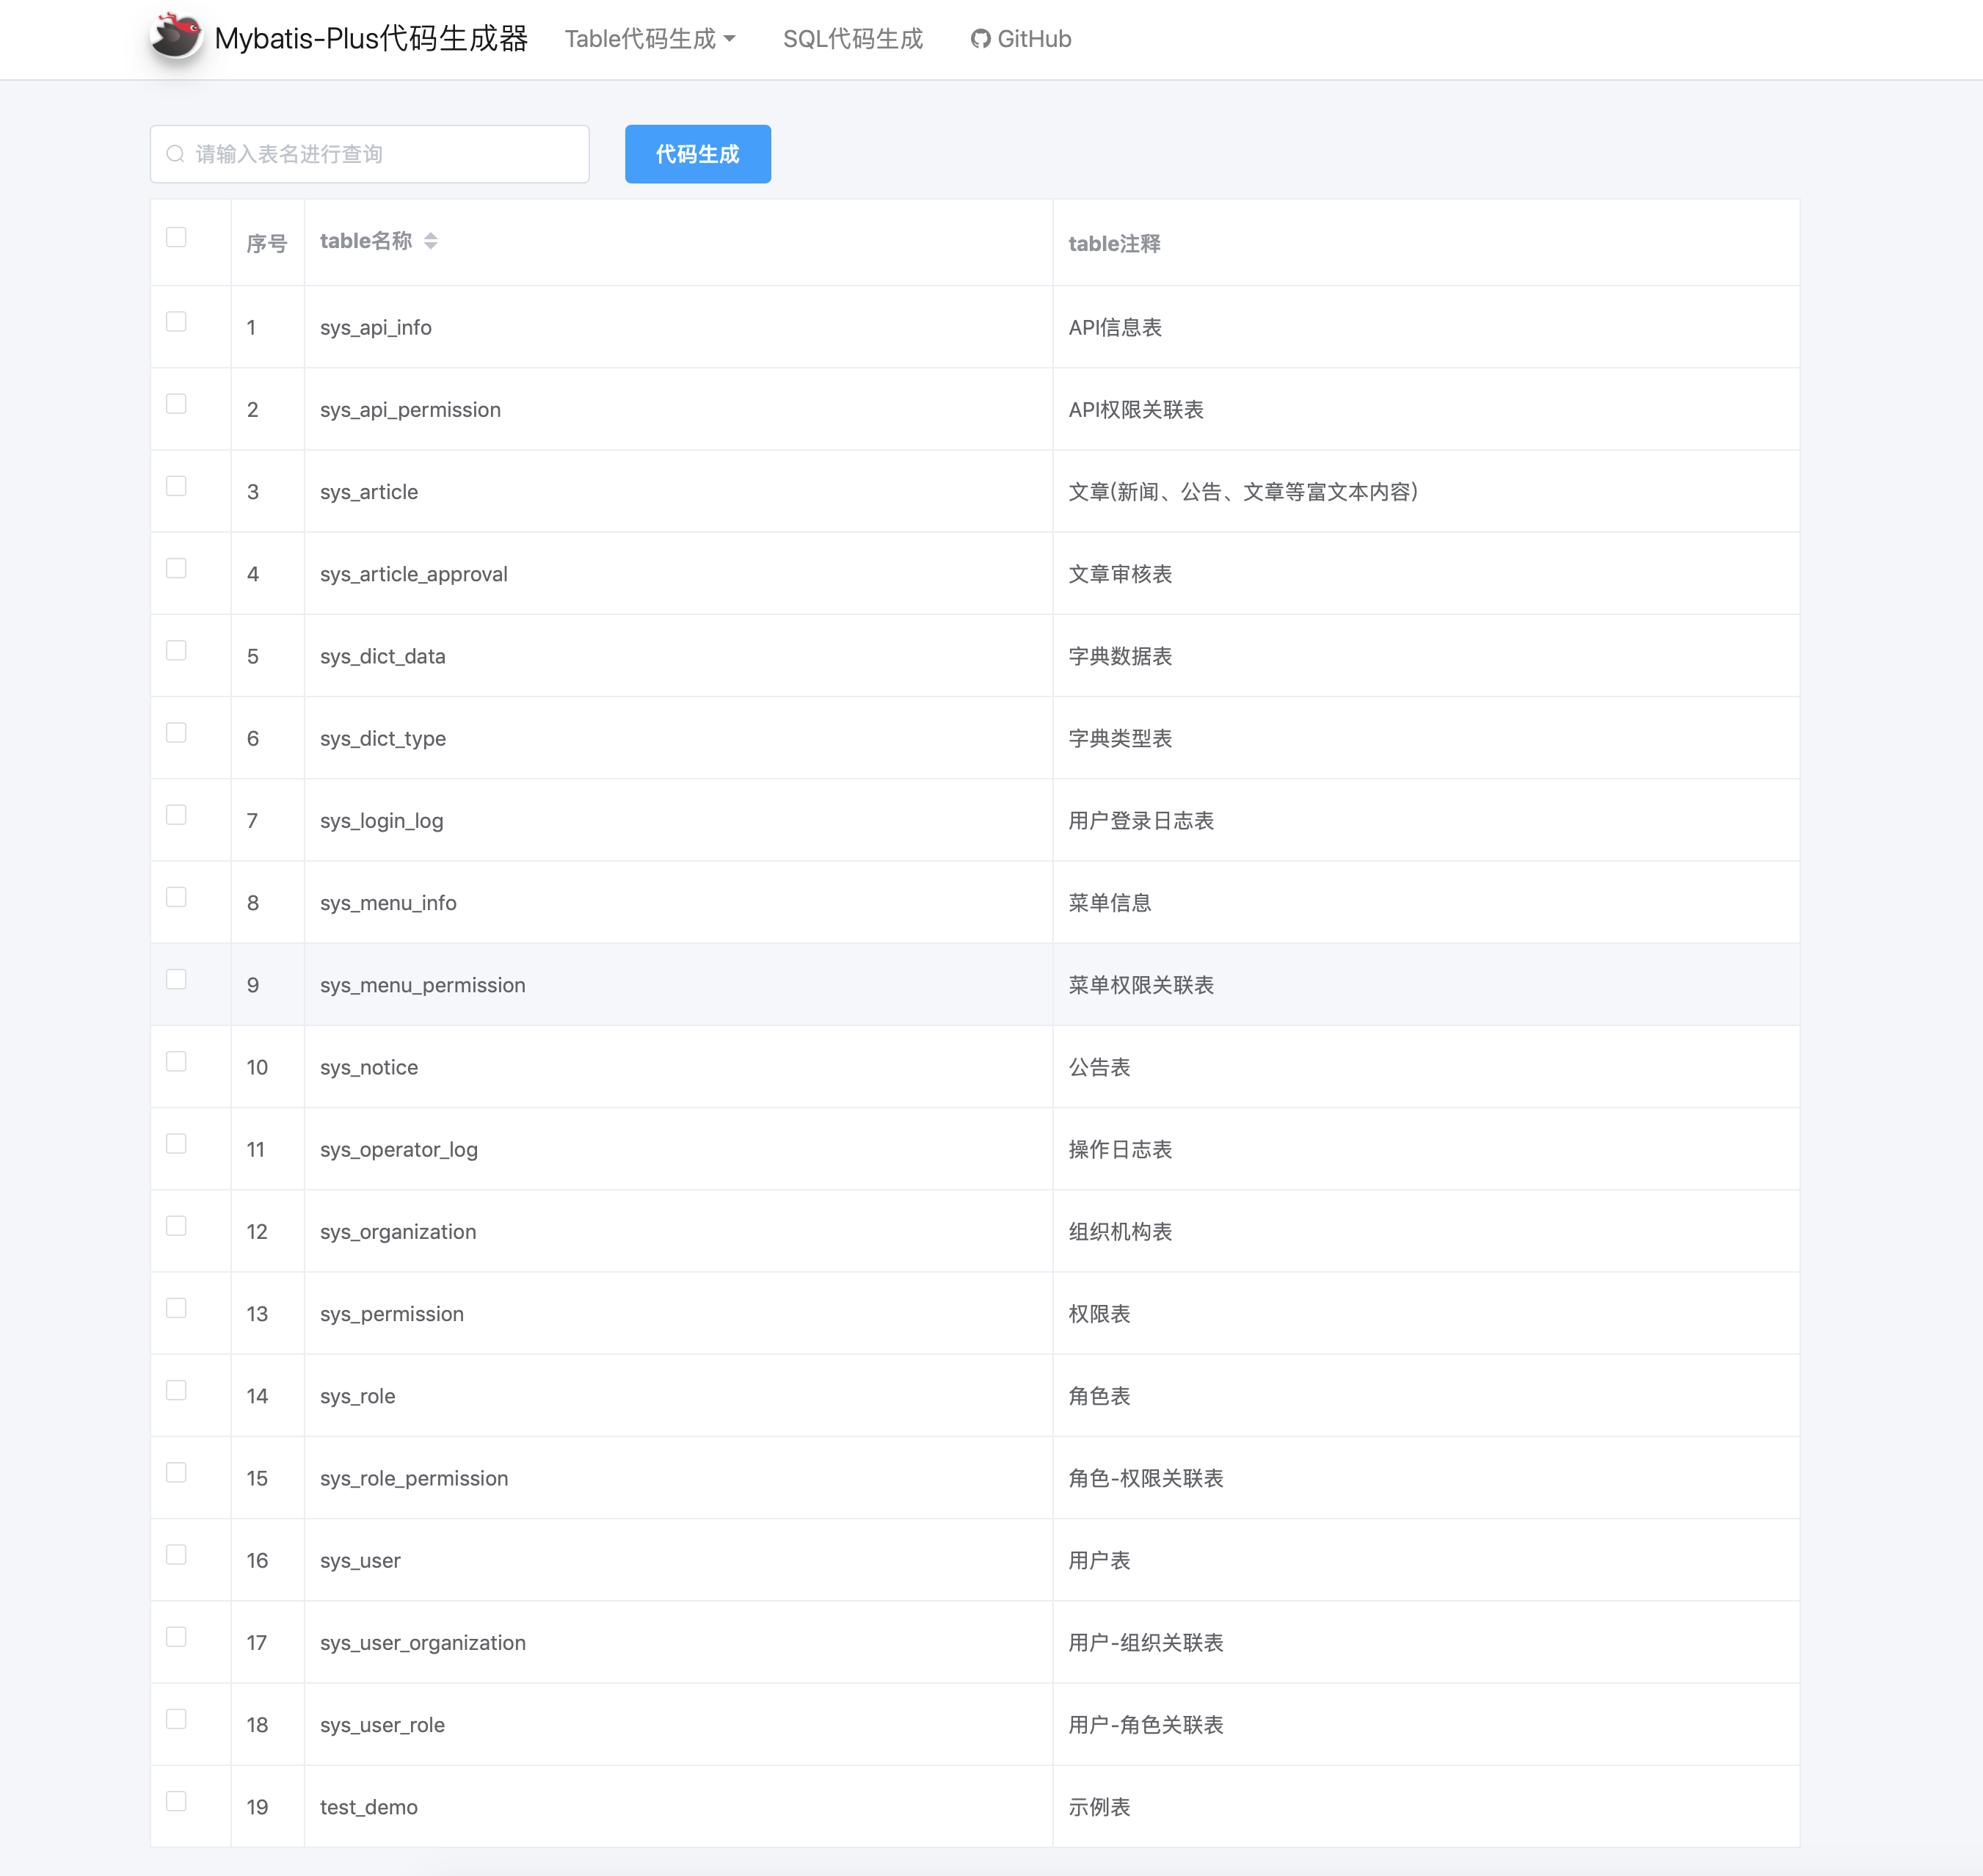
API 开发时首先使用代码生成器生成目录结构以及 class 主体。
# 代码生成器位置:
代码生成器工程为
so-fast-mpg,该工程有两种启动方式,1. 启动 SoFastGeneratorUiServerApplication 文件;2. 启动 TestSoFastGeneratorApplication 文件。两种方式均可。推荐使用方式 2,基于 test 方式进行启动。
so-fast-visual
└── so-fast-mpg
    └── test
        └── java
                ├── TestSoFastGeneratorApplication.java   // 代码生成器
2
3
4
5
2
3
4
5
# 代码生成器配置:
public static void main(String[] args) {
    GeneratorConfig config = GeneratorConfig.builder().jdbcUrl("jdbc:mysql://x.x.x.x:3306/so-fast")
            .userName("db-username") // TODO 修改为自己数据库用户名
            .password("db-password") // TODO 修改为自己数据库密码
            .driverClassName("com.mysql.cj.jdbc.Driver")
            .basePackage("com.sofast.biz") // TODO 设置要生成的业务包路径
            .port(9102) // TODO 设置服务端口号
            .build();
    MybatisPlusToolsApplication.run(config);
}
2
3
4
5
6
7
8
9
10
2
3
4
5
6
7
8
9
10
# 运行:
右键执行 main 函数即可。服务启动之后,在浏览器打开地址 http://localhost:9102/
# 输出配置:
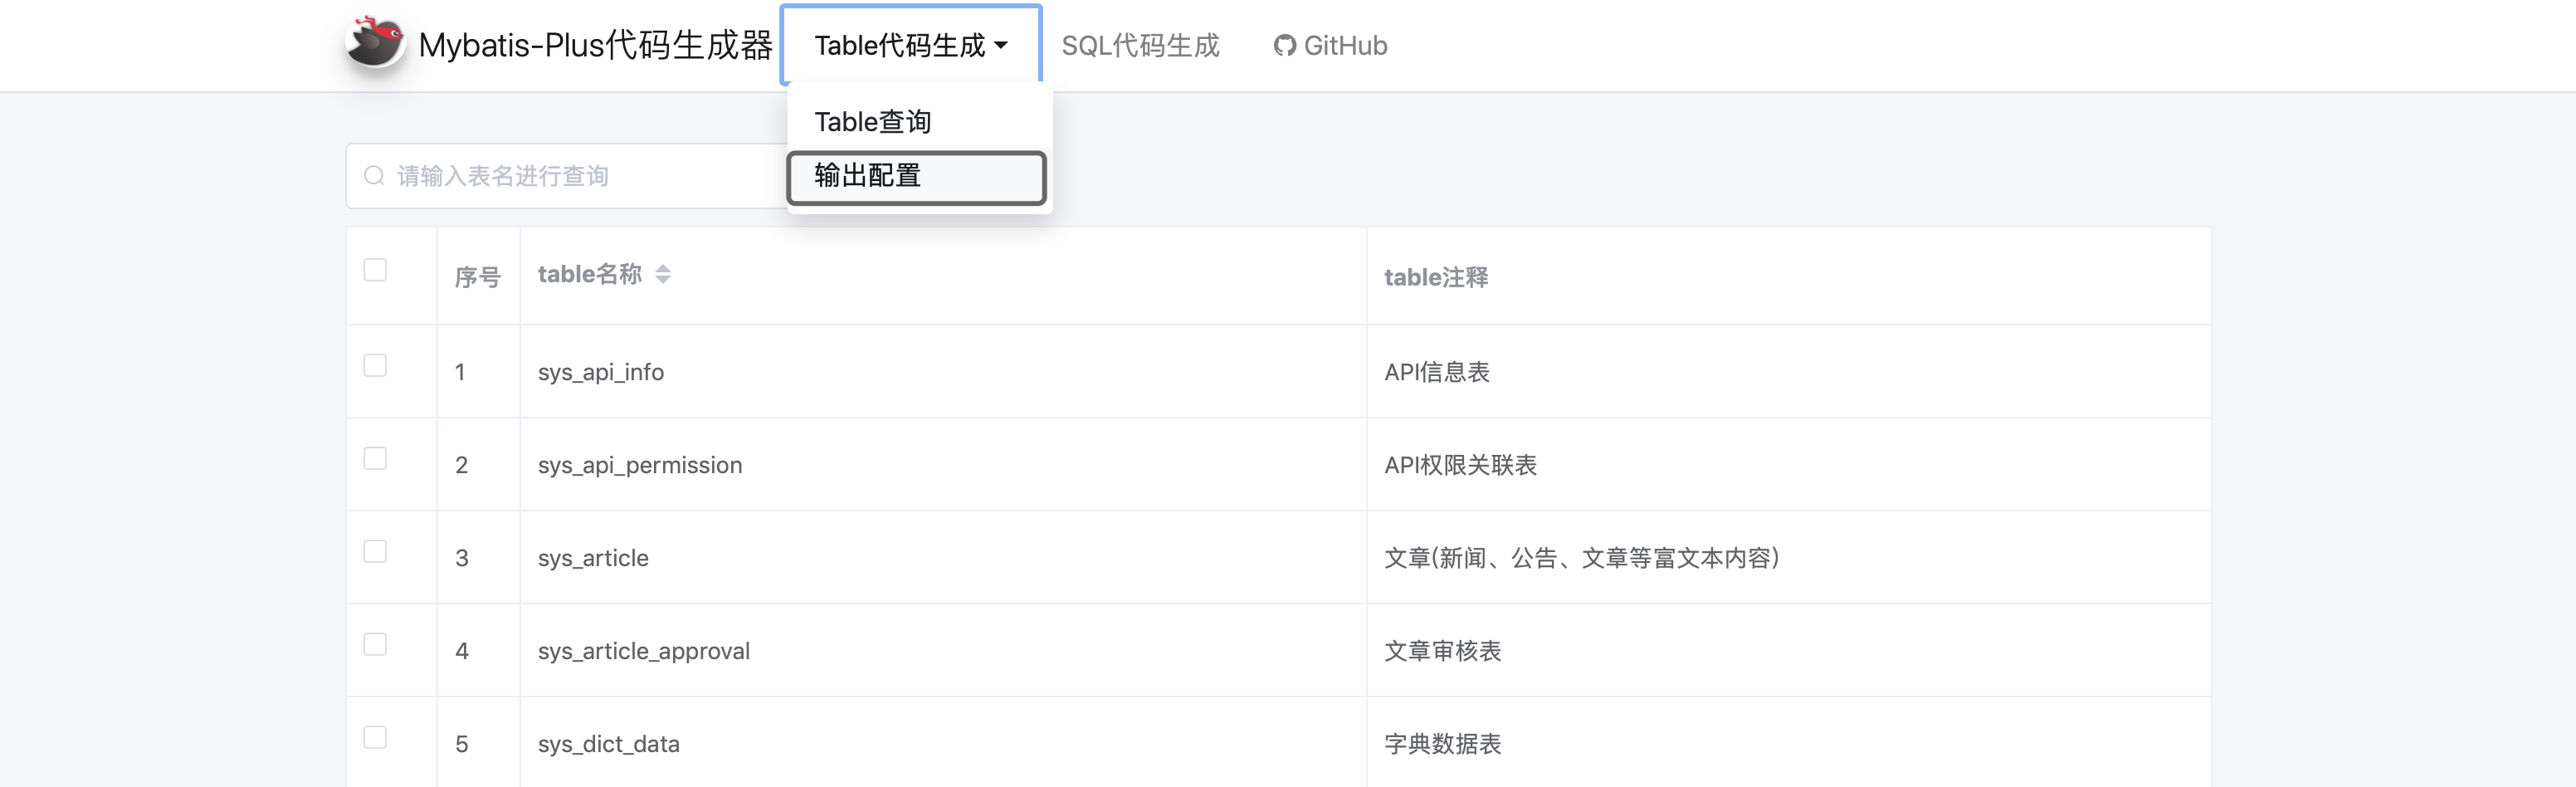
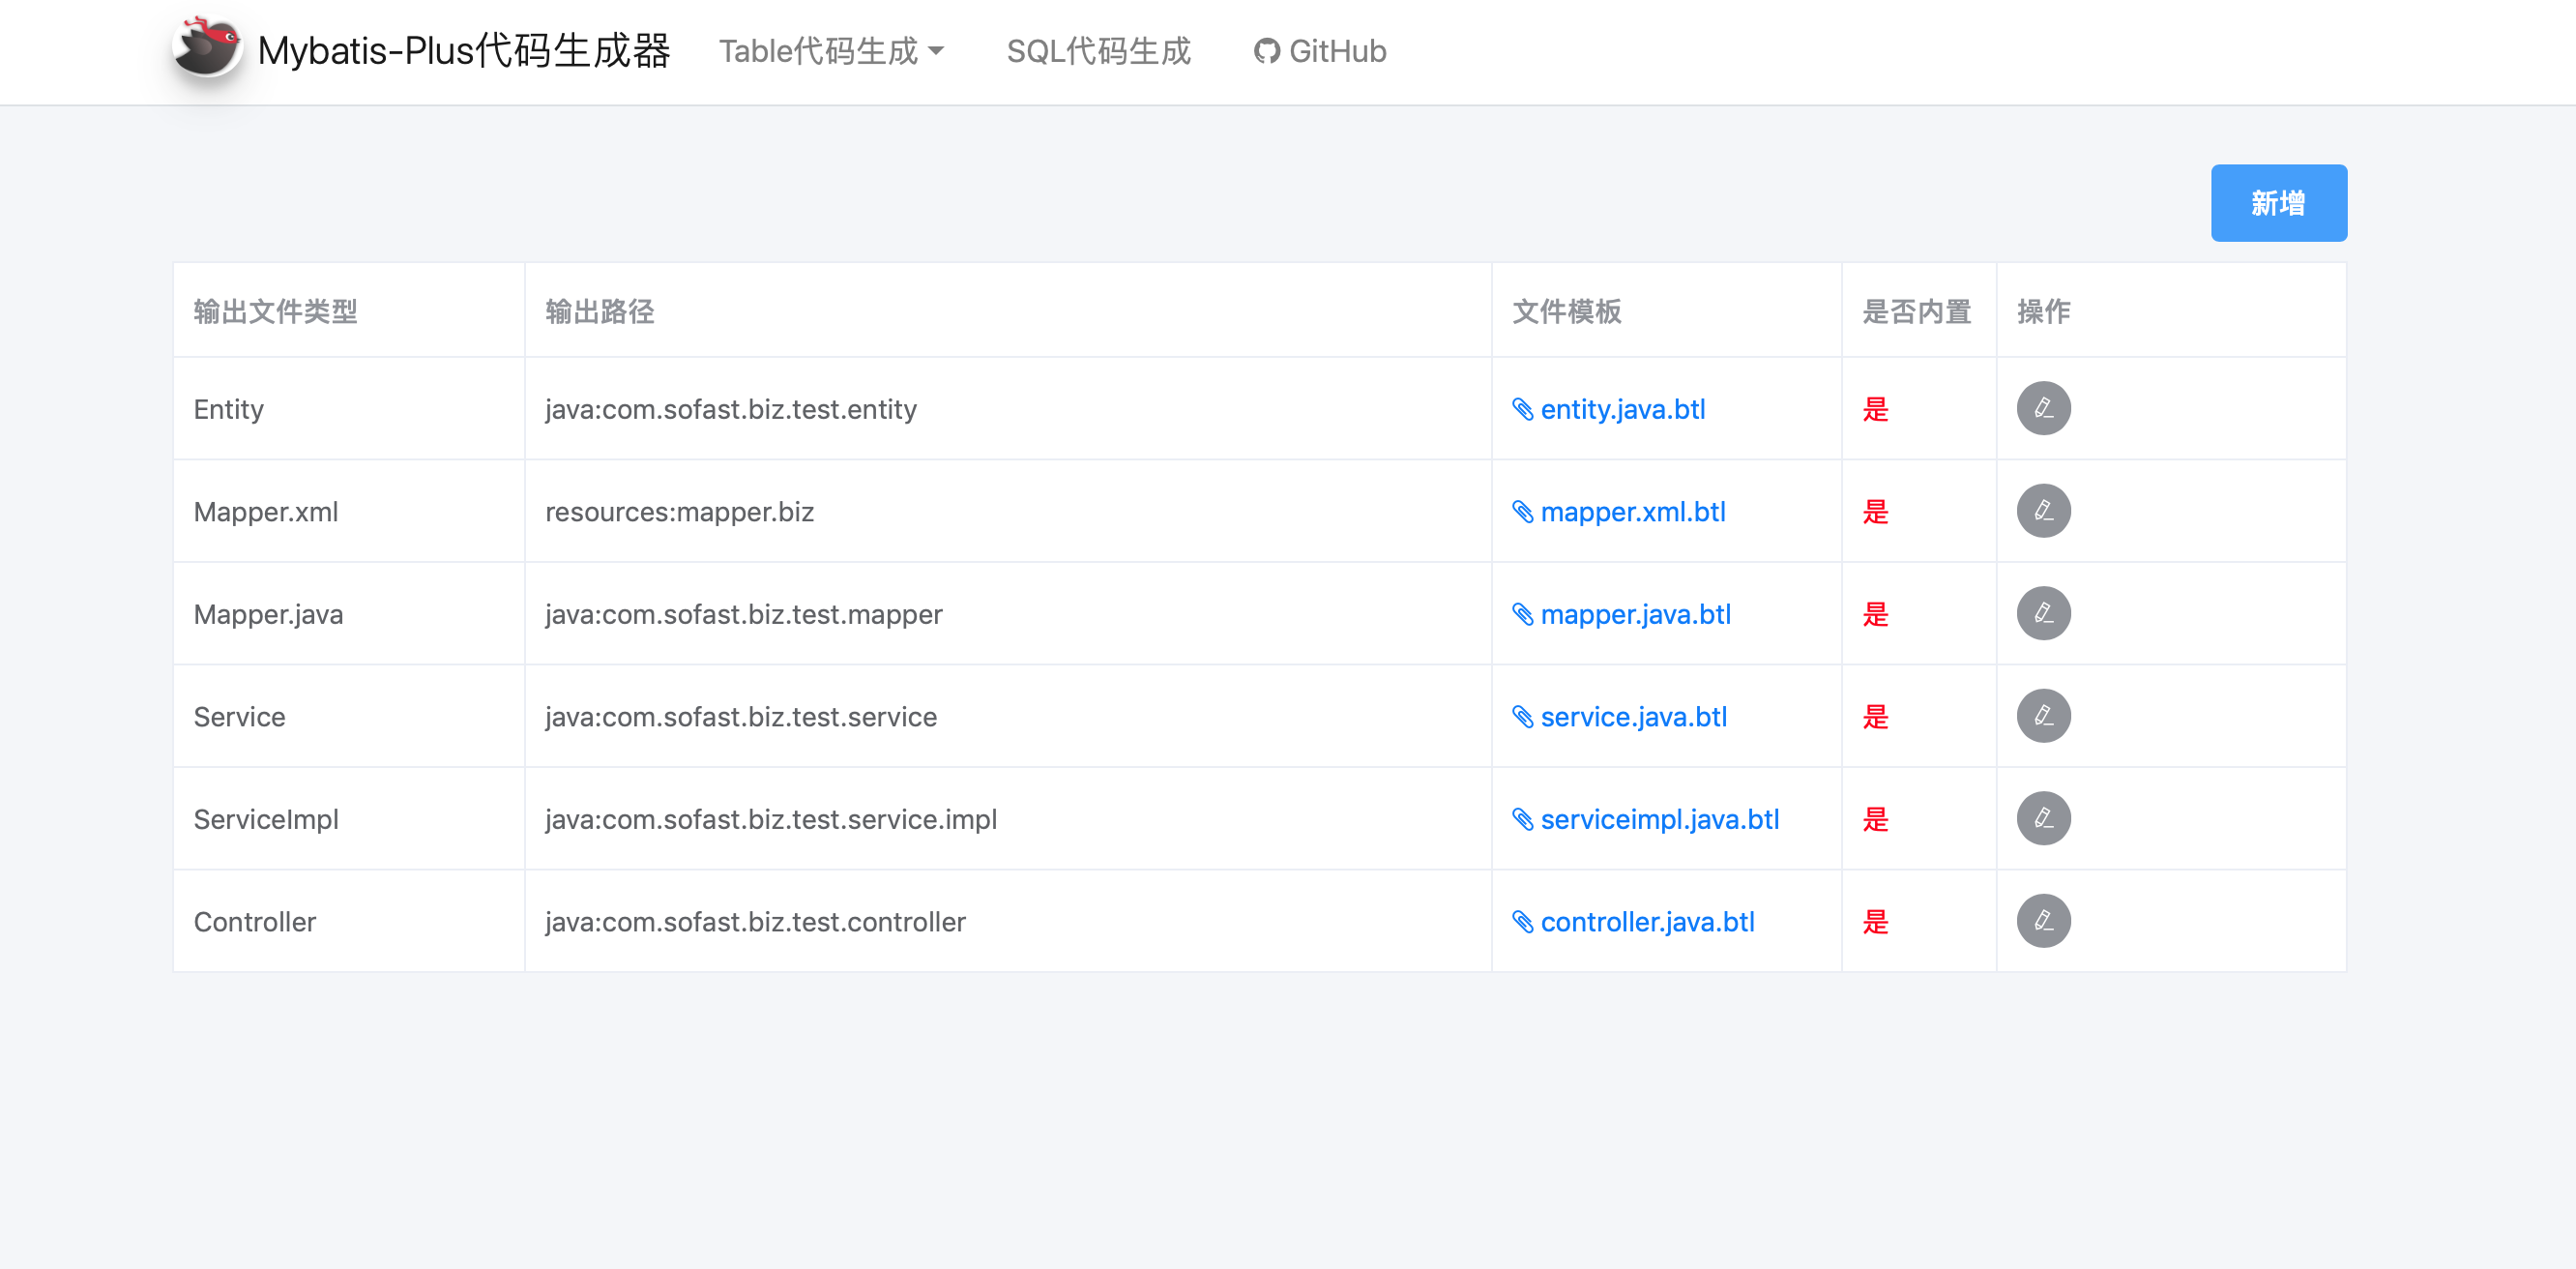
代码生成器提供对 Entity、Mapper、Service、Controller 的全部生成。so-fast 框架提供了模板,可通过上传模板进行自定义代码格式生成。
文件模板位置:
doc
└── code_tpls
    ├── controller.java.btl
    ├── entity.java.btl
    ├── mapper.java.btl
    ├── service.java.btl
    └── serviceimpl.java.btl
1
2
3
4
5
6
71
2
3
4
5
6
7
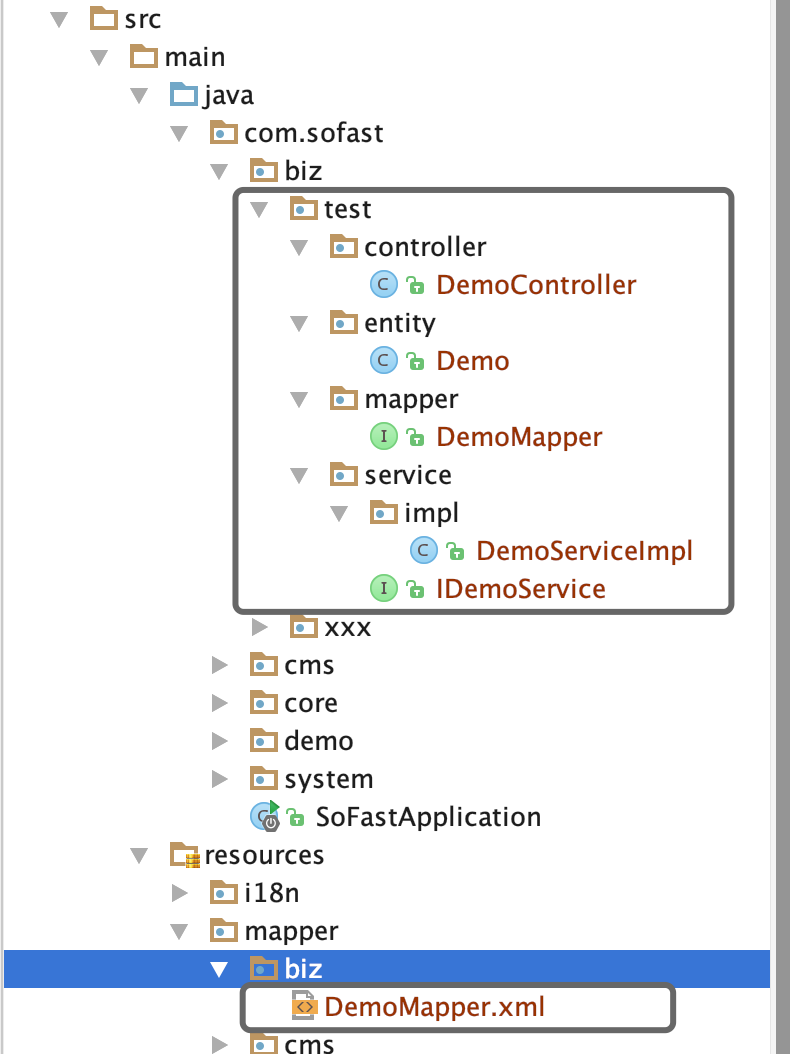
这里需要注意「输出路径」,一定要写正确,这里的输出路径是开发工程中的 package 路径,根据自己业务期望位置进行填写,比如我希望生成到 biz 目录下,并新建一个 test 业务模块,在 test 业务模块中创建自己的 Controller、Service、Mapper、Entity,我期望的目录结构如下:
biz
├── test
│   ├── controller
│   ├── entity
│   ├── mapper
│   └── service
│       └── impl
2
3
4
5
6
7
2
3
4
5
6
7
另外,针对 entity 和 controller 需要在页面进行一些设置,便于生成更符合要求的代码。
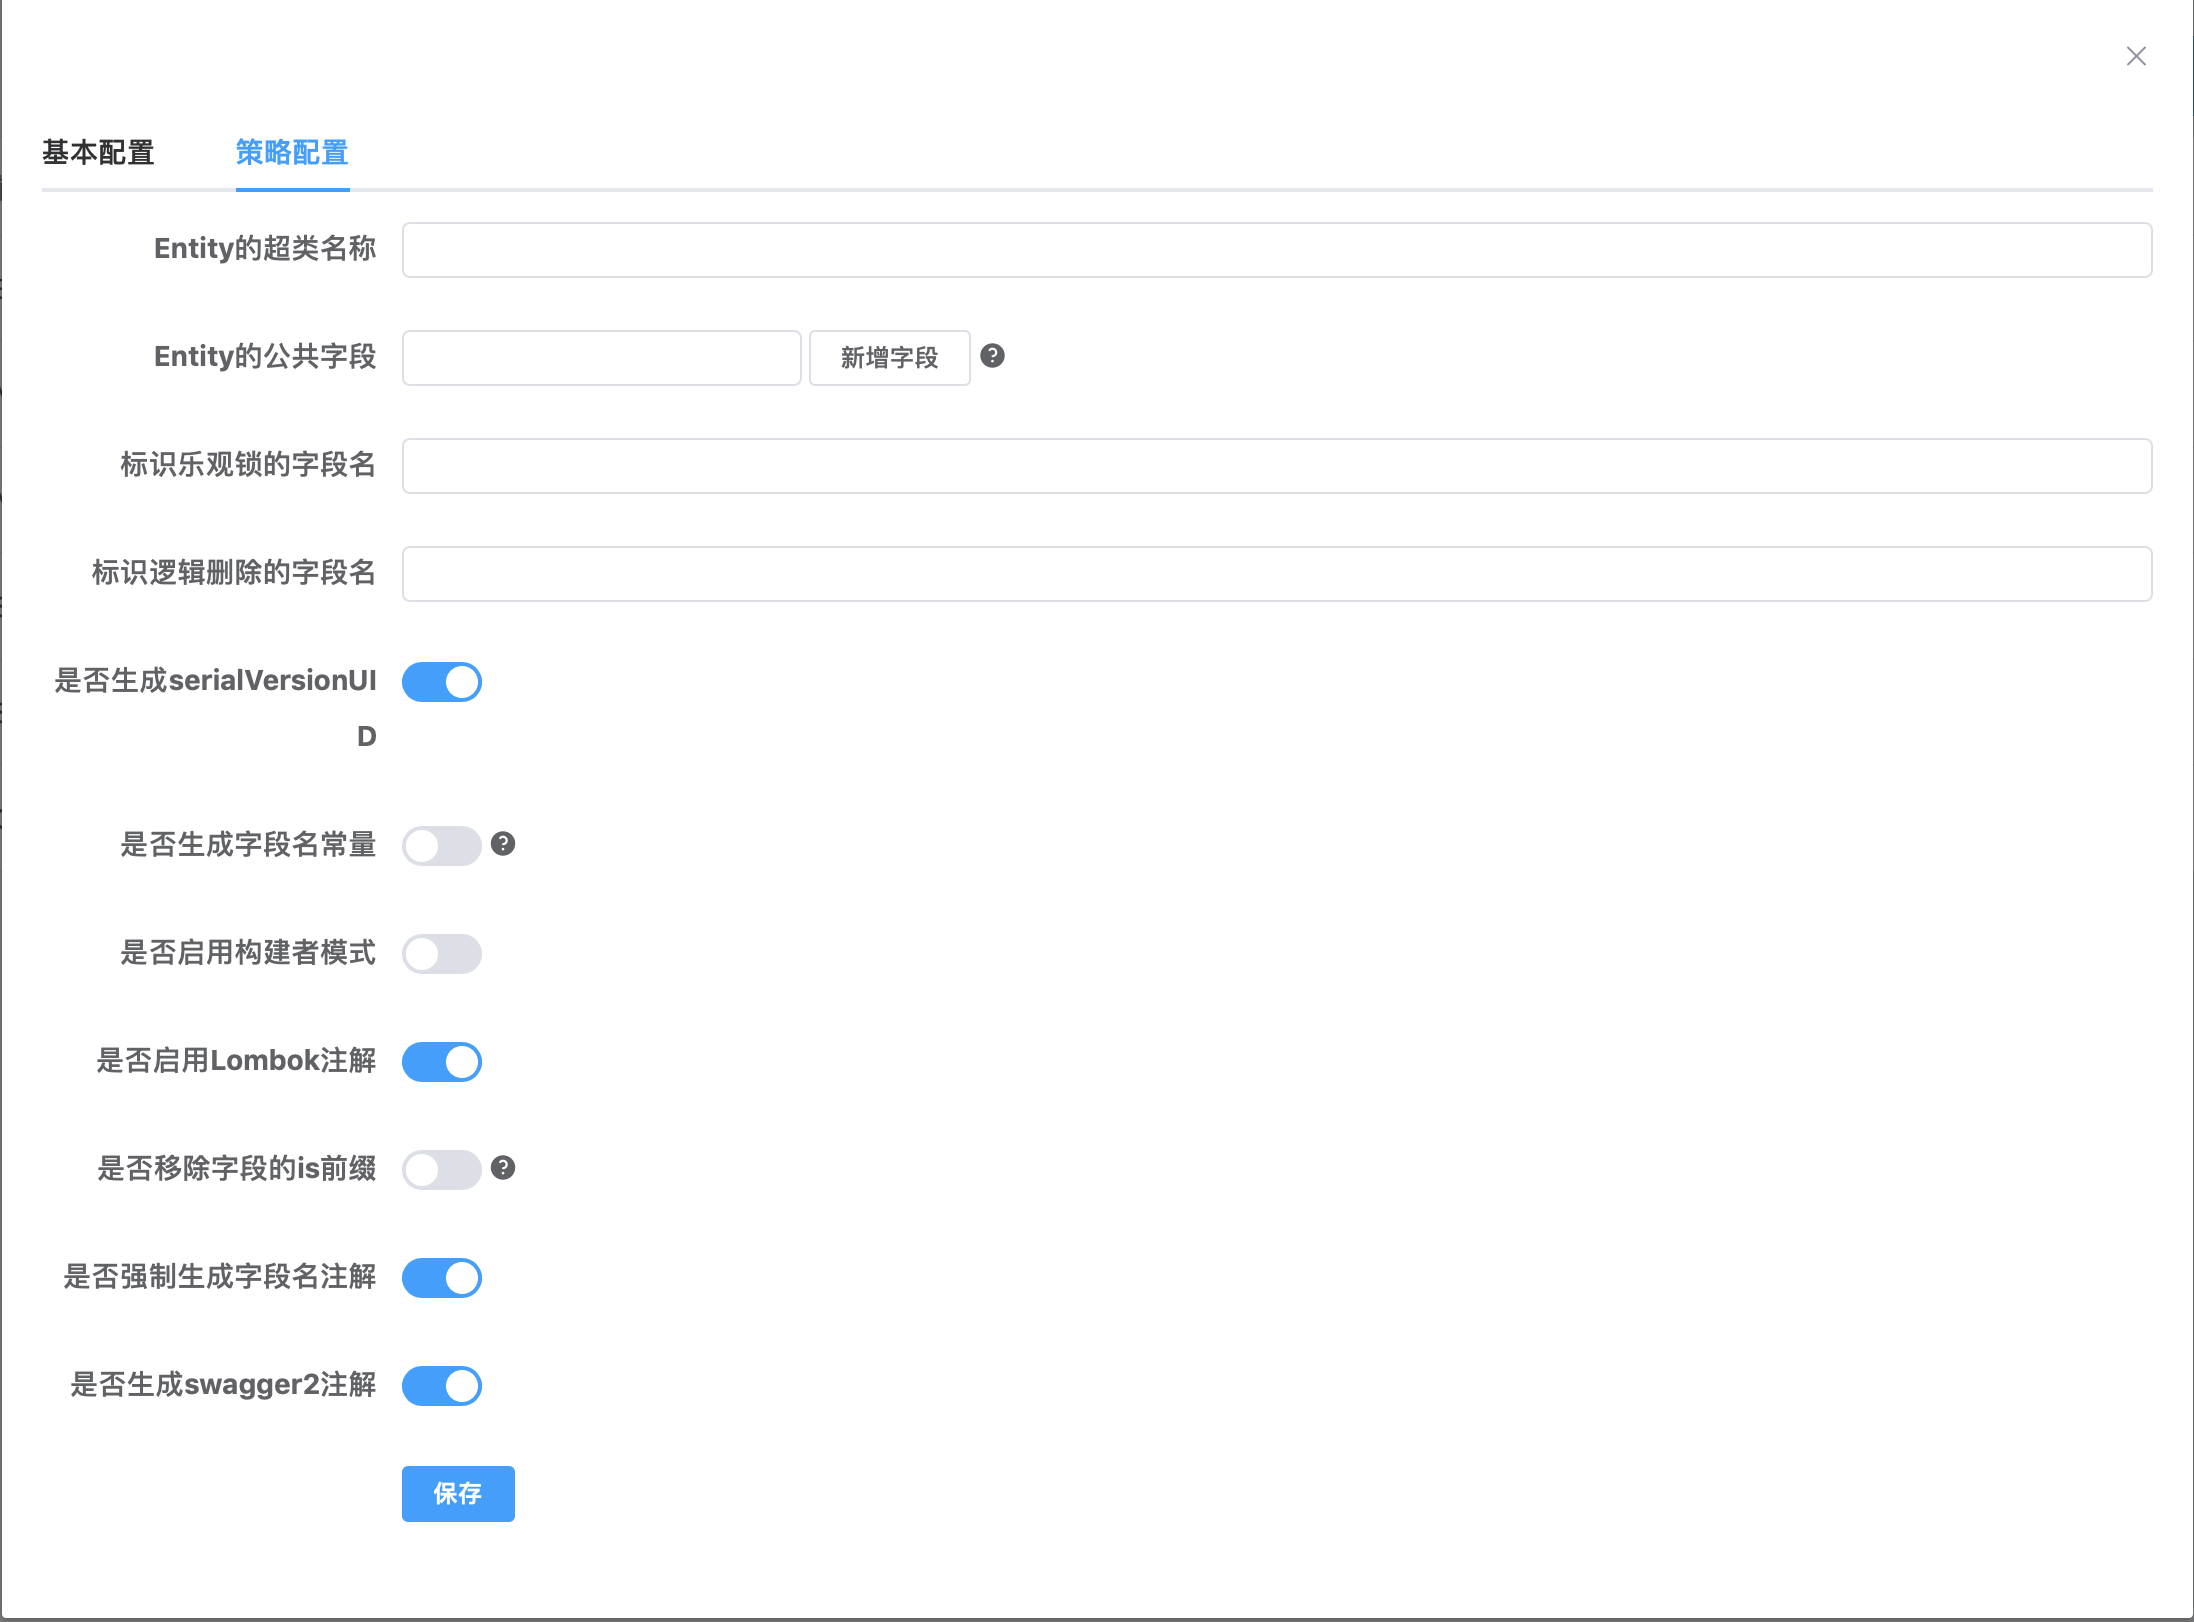
点击 Entity 行的「操作」按钮,打开「策略配置」选项,将启用 lombok、生成注解、生成 swagger2 注解选项打开并保存。
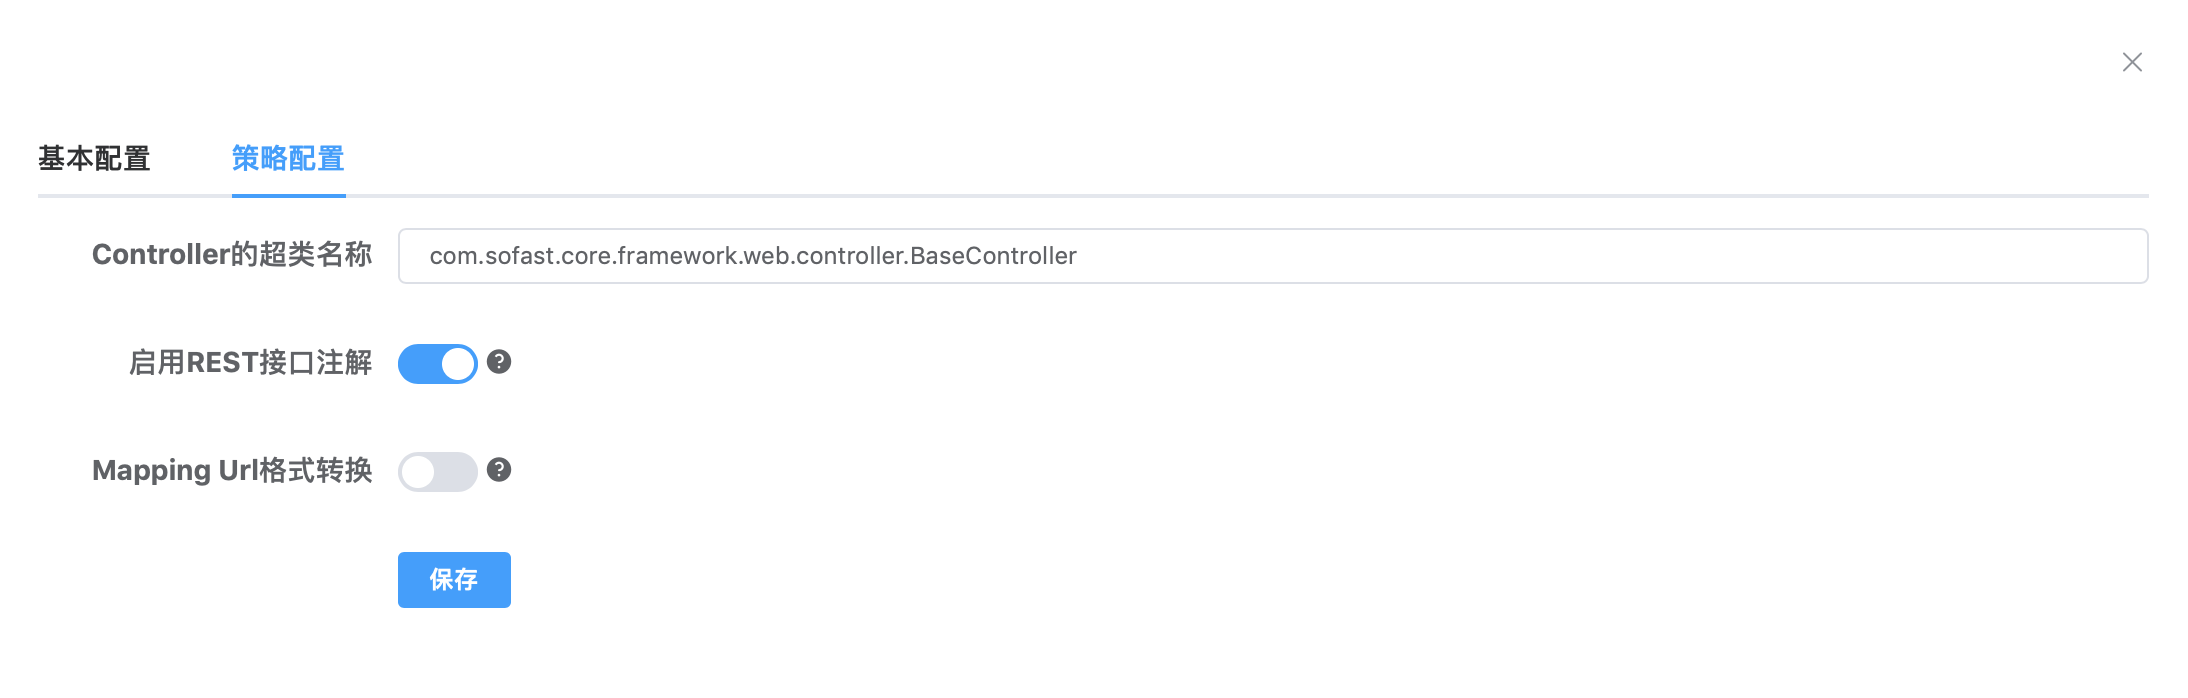
点击 Controller 行的「操作」按钮,打开「策略配置」选项,在「Controller 的超类名称」栏中填入 Controller 的父类「com.sofast.core.framework.web.controller.BaseController」,so-fast 要求所有的 Controller 类必须继承该父类。另外将「启用 REST 接口注解」选项打开并保存。
# 代码生成:
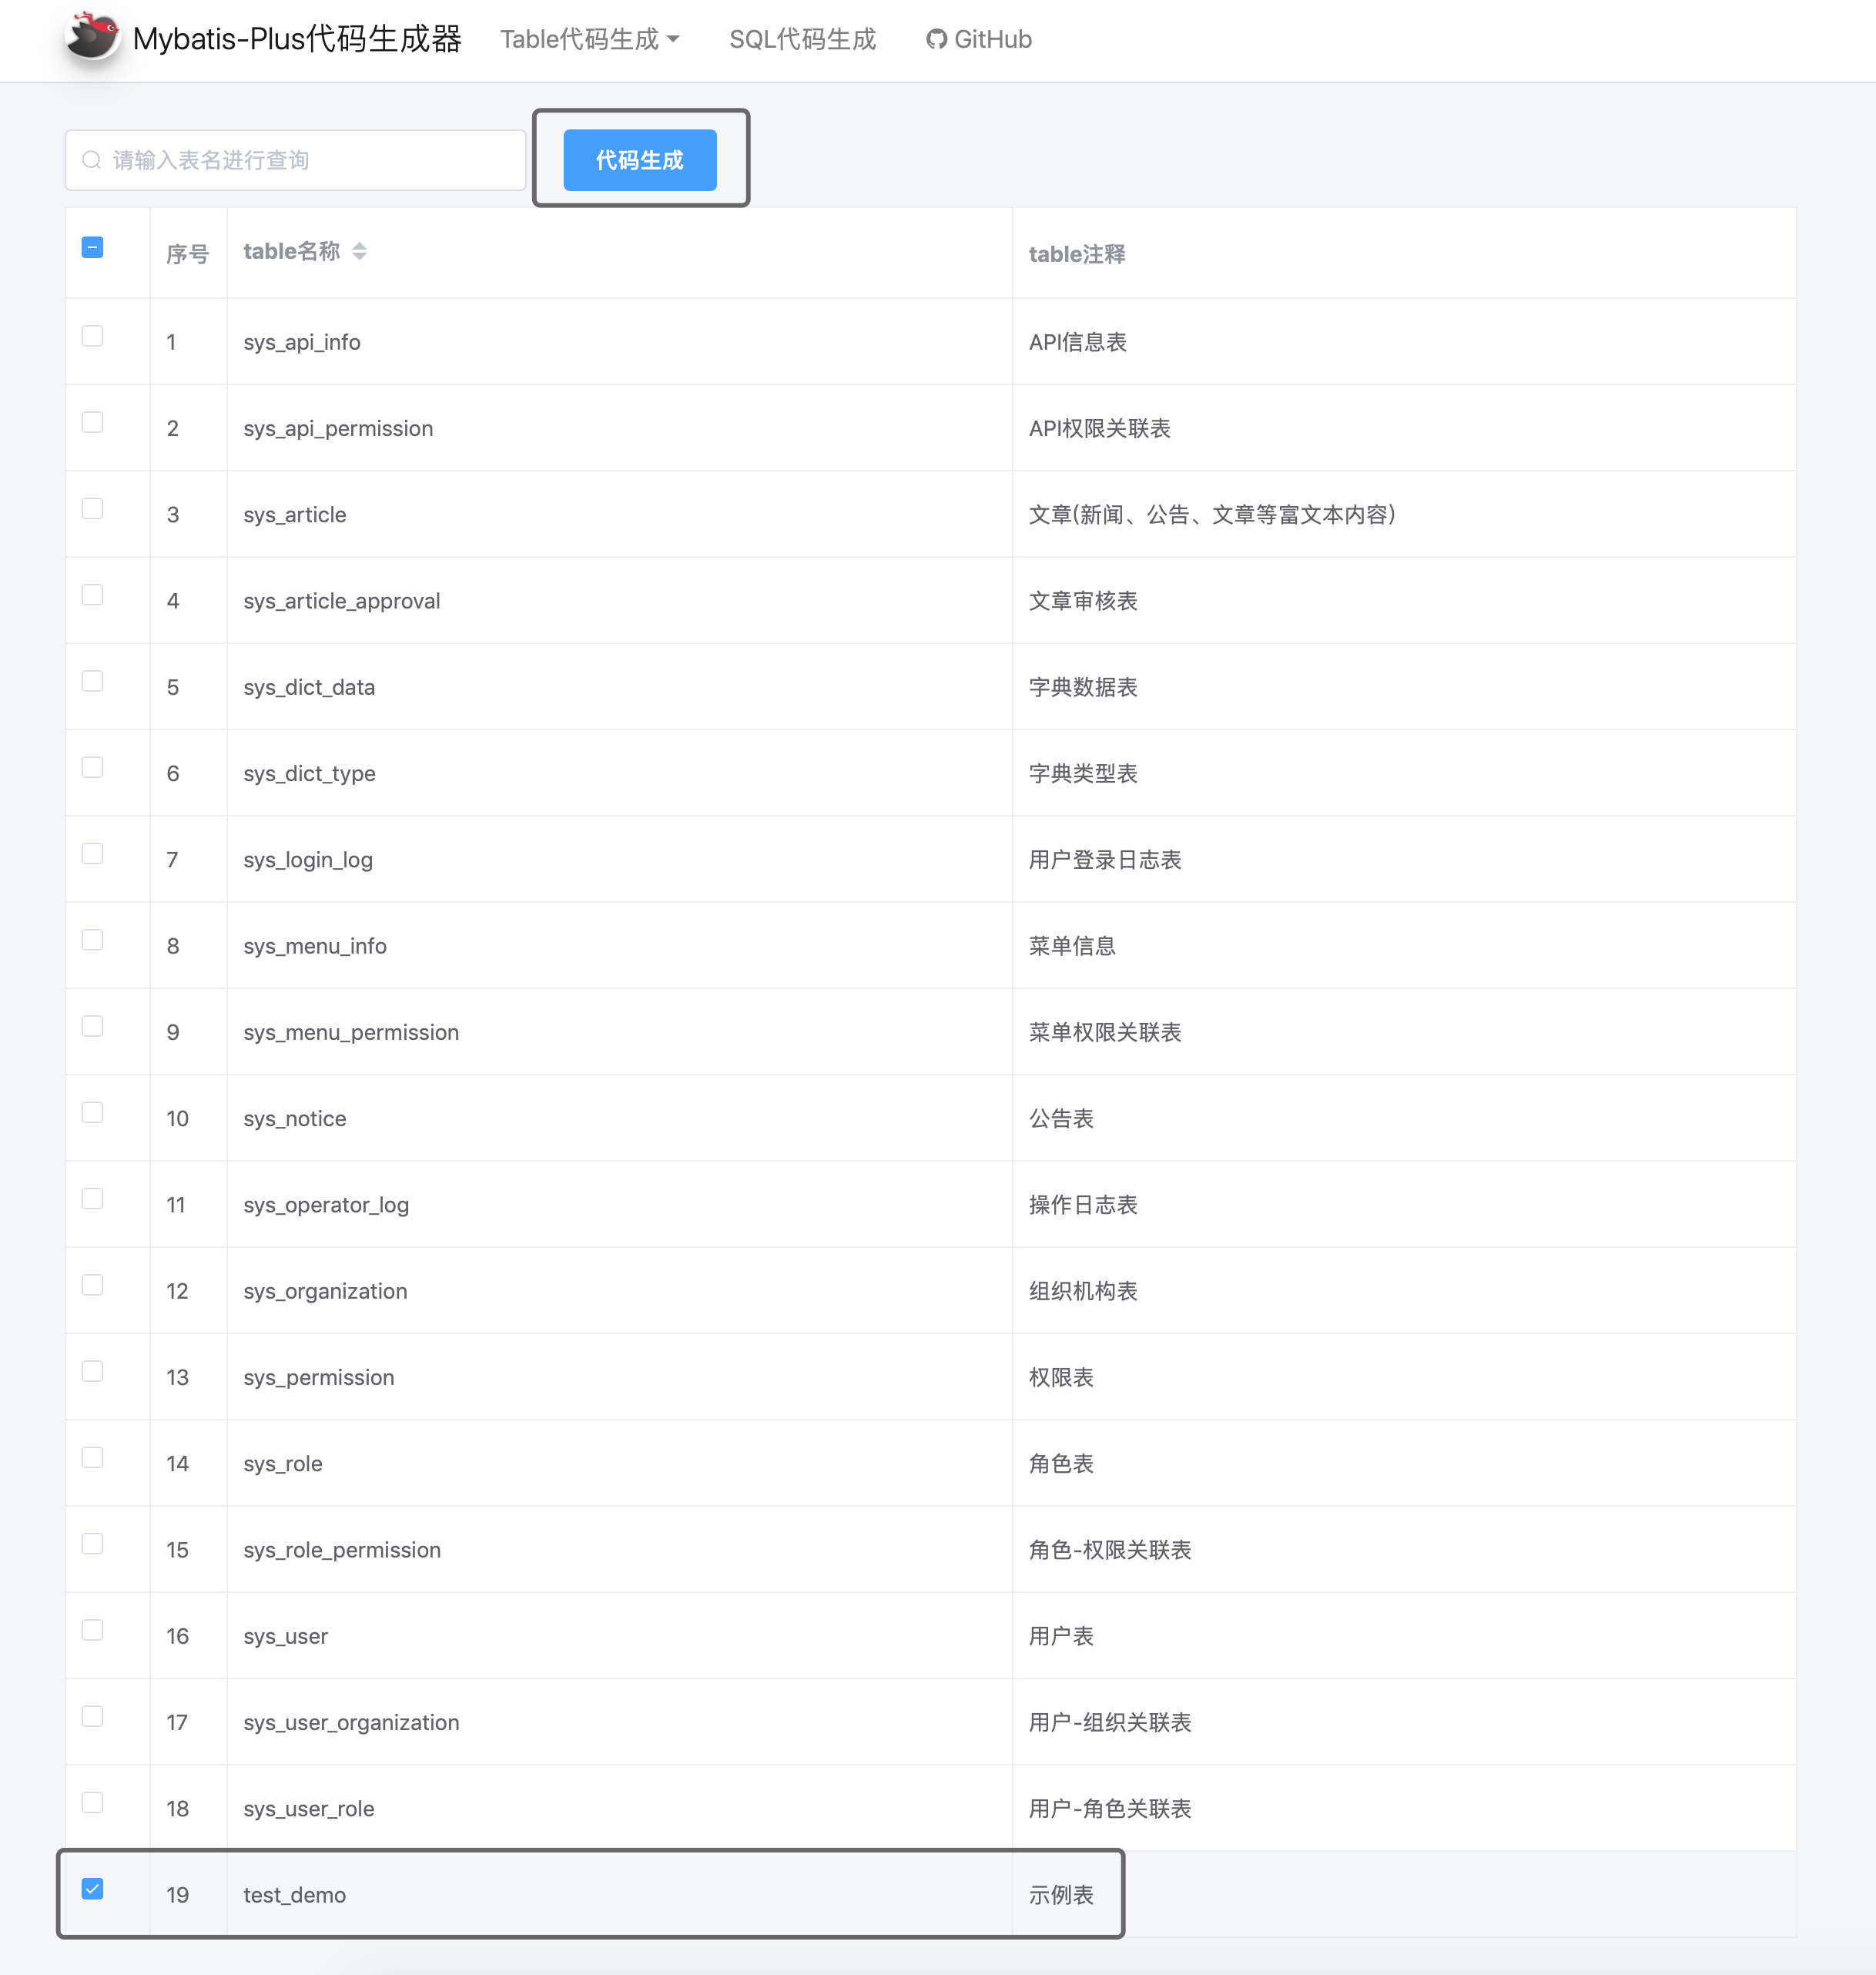
重新回到 Table 列表页面,选中需要操作的表,并点击「代码生成」按钮
在打开的页面中,输入以下内容,点击「开始生成」进行定制化代码生成。代码会自动生成到工程对应的包下。
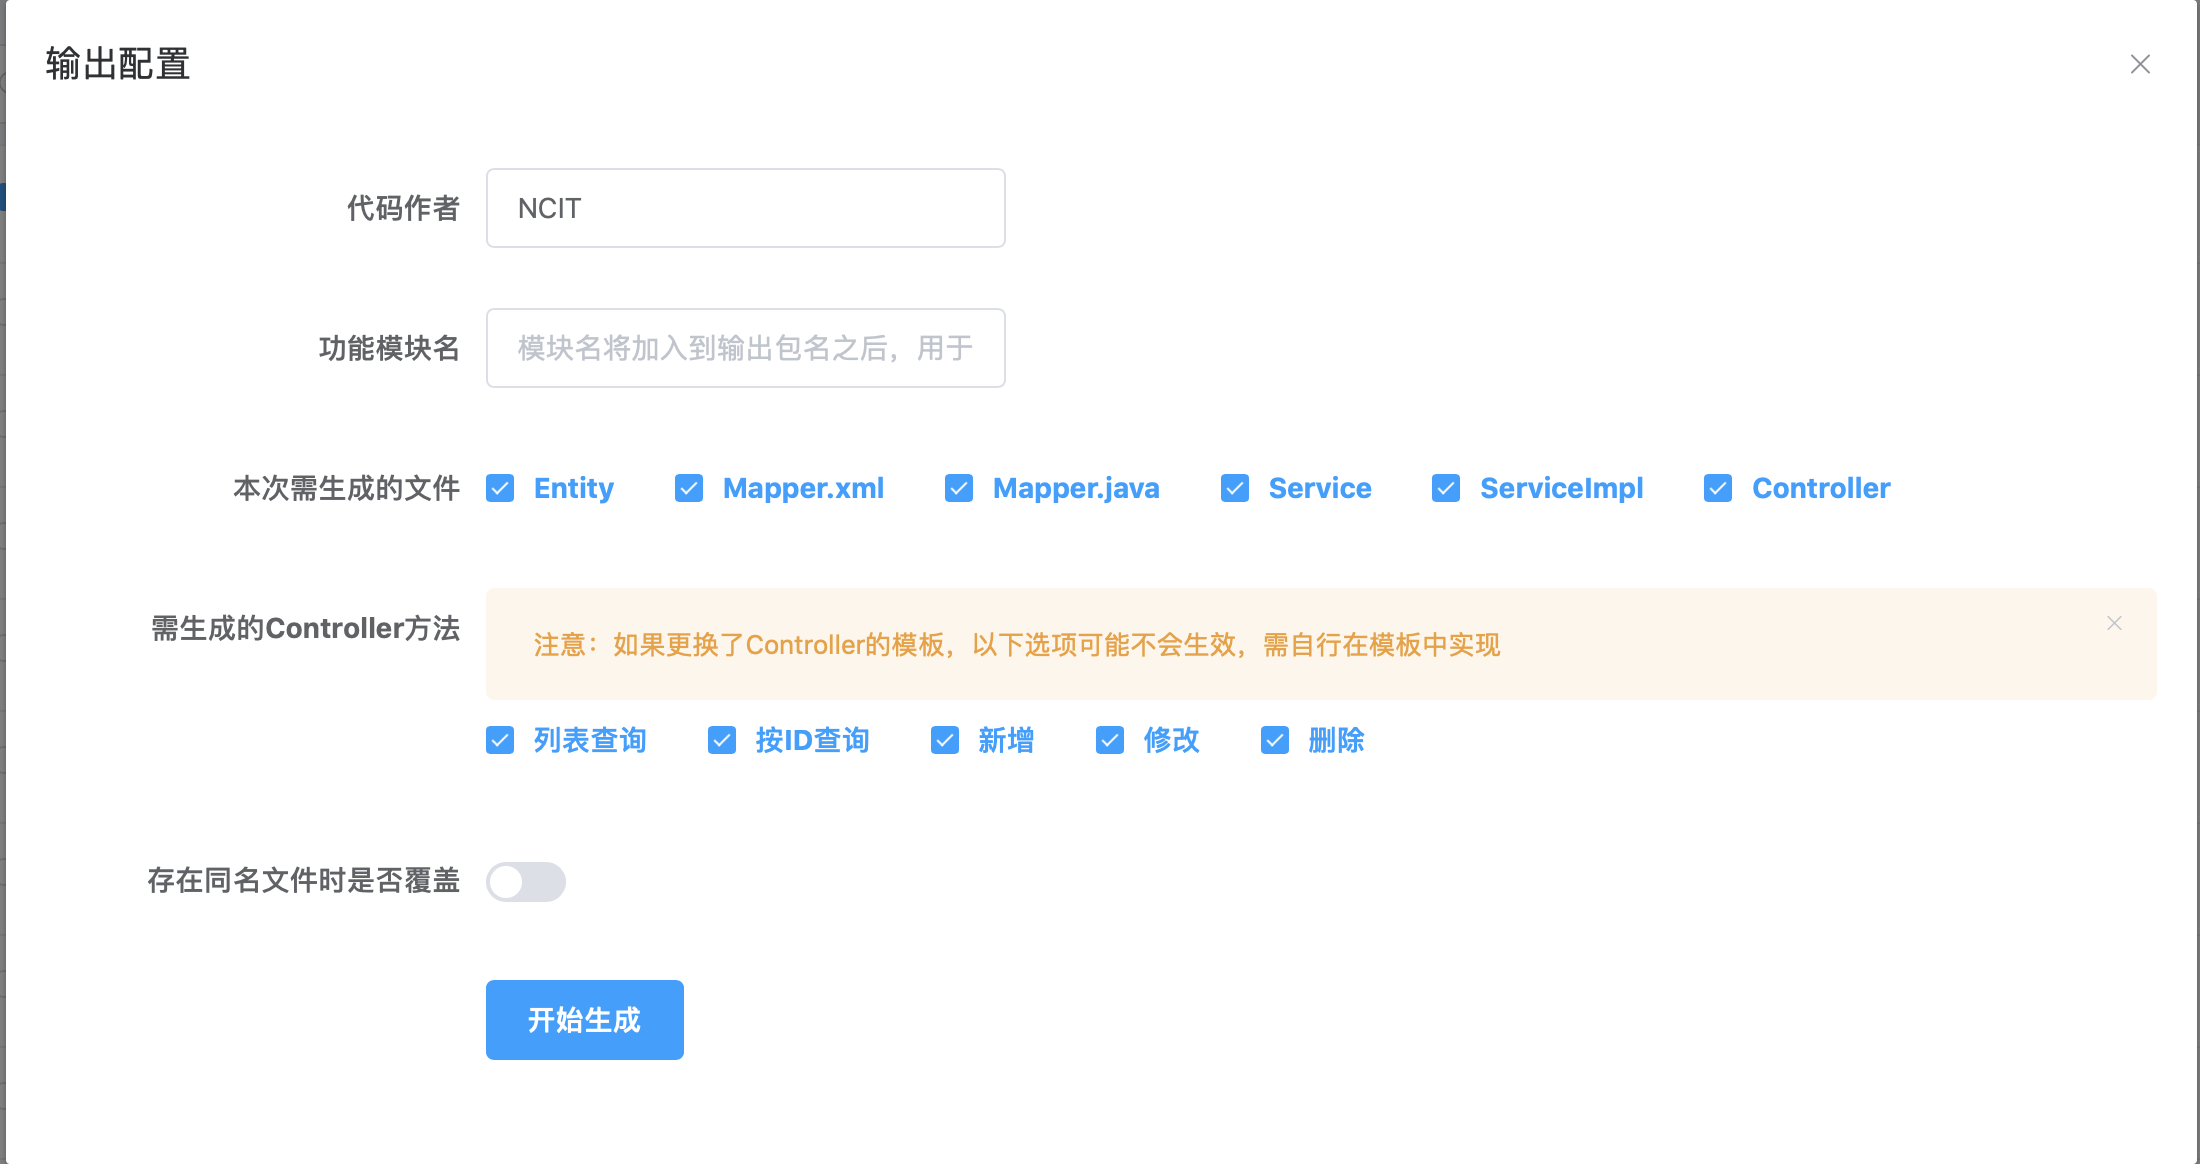
注意:因为在「输出路径」已经填写好了,完整的路径,这里的「功能模块名」请不要填写任何东西!!!
如果需要进行重复生成时,可以开启文件覆盖选项,将之前的旧文件覆盖,但使用时要注意,别覆盖了已经编写好的代码!!!
点击「开始生成」后,我们来看下代码生成结果:
如我们预期一样,我们得到了正确的代码结构和代码文件。
常见问题:
代码生成器页面一段时间后,Table 列表显示不出来,控制台有 Exception 抛出,这个是因为数据库连接池问题,过一会刷新页面就正常了。
# 控制器 Controller
Controller 中不允许编写业务逻辑处理。
原则上禁止在 Controller 中使用事务注解
so-fast 框架规定控制器的职责是负责接受用户的请求,以及将业务处理结果返回给用户的流程控制。在控制器中不应该编码业务逻辑处理代码,业务逻辑代码应该编写在 Service 层,控制器只负责调用获取结果。
# Controller 类的定义
Controller 的定义需要遵循以下规范:
@RestController 注解,表示提供 rest api
@RequestMapping 注解,指定 api 的通用前缀 path,path 需遵循 REST 规范,使用名词来表示资源路径
@Api 注解,书写 swagger 文档
需要继承父类 BaseController
Good:
@Api(value = "字典数据操作API", tags = "字典数据")
@RestController
@RequestMapping("/dict/data")
public class DictDataController extends BaseController {
2
3
4
2
3
4
# Controller 中的 Method 定义
Method 的定义需要遵循以下编码规范:
使用 @GetMapping 或 @PostMapping 注解,指定 api 的 path,以及请求 Method。
使用 @LogOperator 注解,进行操作日志的记录
使用 @ApiOperation 注解,书写 swagger 文档
使用 R<?> 的泛型作为统一响应体
Good:
@ApiOperation(value = "根据ID查询")
@LogOperator(title = "字典管理-根据ID查询字典", type = Constants.SELECT_OPERATOR)
@GetMapping(value = "/{id}")
public R<DictData> getById(@PathVariable("id") String id) {
    return R.data(iDictDataService.getById(id));
}
2
3
4
5
6
2
3
4
5
6
注意:R<?> 泛型需要根据实际返回值的类型进行具体化,不推荐直接写 R
# 业务逻辑 Service
Service 是 api 的业务核心逻辑所在。
Service 采用接口抽象方式。
so-fast 框架规定 Service 的职责是负责处理业务逻辑以及事务处理。
# Service 接口的定义
Service 接口的定义需要遵循以下规范:
接口名必须以「I」字母开头
接口必须 extends IService
Good:
/**
 * 系统设置 服务类
 * @Package: com.sofast.system.setting.service
 * @Description: 设置系统名 logo 验证码开关等
 * @Date : 2020-12-16
 * @Author NCIT
 */
public interface ISysSettingsService extends IService<SystemSettings> {
2
3
4
5
6
7
8
2
3
4
5
6
7
8
# Service 实现类的定义
Method 的定义需要遵循以下编码规范:
使用 @Service 注解,标注业务层组件。
实现类必须 extends ServiceImpl,并 implements 父接口
Good:
/**
 * 系统设置 服务实现类
 *
 * @Package: com.sofast.system.setting.service.impl
 * @Description: 设置系统名 logo 验证码开关等
 * @Date : 2020-12-16
 * @Author NCIT
 */
@Service
public class SysSettingsServiceImpl extends ServiceImpl<SysSettingsMapper, SystemSettings> implements ISysSettingsService {
2
3
4
5
6
7
8
9
10
2
3
4
5
6
7
8
9
10
# 映射器 Mapper
使用代码生成器生成 Mapper 接口以及 Mapper.xml 文件
so-fast 框架的 ORM 基于 Mybatis-plus 实现,因此规范所有的业务 Mapper 必须继承 Mybatis-plus 的通用 Mapper。
# Mapper 接口的定义
Mapper 接口的定义需要遵循以下规范:
接口必须 extends BaseMapper
Good:
/**
 * 系统设置 Mapper 接口
 * @Package: com.sofast.system.setting.mapper
 * @Description: 系统设置
 * @Date : 2020-12-16
 * @Author NCIT
 */
public interface SysSettingsMapper extends BaseMapper<SystemSettings> {
2
3
4
5
6
7
8
2
3
4
5
6
7
8
通用 Mapper 中已经实现了基本的增删改查功能,对于表的基本操作,不需要写 sql 文。
# SQL 文
对于复杂的 sql 处理,需要书写 SQL 文来提供业务处理。(不推荐写复杂的表关联,对于表关联等操作,建议在应用层处理)
当 mybatis-plus 提供的通用方法无法满足业务需求时,可以通过自定义方法和写 sql 文的方式来实现。
利用代码生成器,在 resources 目录下会生成 xml 文件
src/main/resources
└── mapper
    ├── biz
    ├── dict
    │   ├── DictDataMapper.xml
    │   └── DictTypeMapper.xml
    ├── setting
    └── upms
2
3
4
5
6
7
8
2
3
4
5
6
7
8
按照如下格式规范编写 mybatis sql 文
<?xml version="1.0" encoding="UTF-8"?>
<!DOCTYPE mapper PUBLIC "-//mybatis.org//DTD Mapper 3.0//EN" "http://mybatis.org/dtd/mybatis-3-mapper.dtd">
<mapper namespace="com.sofast.system.dict.mapper.DictTypeMapper">

    <sql id="selectColumn">
        select id, dict_name, dict_type, status, remark, create_user, create_time, update_user, update_time
        from sys_dict_type
    </sql>

    <sql id="orderColumn">
        order by dict_type, update_time desc
    </sql>

    <select id="list" parameterType="DictTypeQueryVo" resultType="DictType">
        <include refid="selectColumn"/>
        <where>
            <if test="dictTypeQueryVo.dictName != null and dictTypeQueryVo.dictName != ''">
                AND dict_name like concat('%', #{dictTypeQueryVo.dictName}, '%')
            </if>
            <if test="dictTypeQueryVo.dictType != null and dictTypeQueryVo.dictType != ''">
                AND dict_type like concat('%', #{dictTypeQueryVo.dictType}, '%')
            </if>
            <if test="dictTypeQueryVo.status != null and dictTypeQueryVo.status != ''">
                AND status = #{dictTypeQueryVo.status}
            </if>
        </where>
        <include refid="orderColumn"/>
    </select>

</mapper>
2
3
4
5
6
7
8
9
10
11
12
13
14
15
16
17
18
19
20
21
22
23
24
25
26
27
28
29
30
2
3
4
5
6
7
8
9
10
11
12
13
14
15
16
17
18
19
20
21
22
23
24
25
26
27
28
29
30
select 节点的 id 属性值,对应 mapper 接口中的方法名,parameterType 对应方法的参数类型,resultType 对应方法的返回值。
在 Mapper 接口中自定义 list 方法。
public interface DictTypeMapper extends BaseMapper<DictType> {

    public Page<DictType> list(Page<DictType> page, @Param("dictTypeQueryVo") DictTypeQueryVo dictTypeQueryVo);

}
2
3
4
5
2
3
4
5
在 Service 接口中自定义 list 方法。
public interface IDictTypeService extends IService<DictType> {

    /**
     * 条件查询列表
     * @param page
     * @param dictTypeQueryVo
     * @return
     */
    public Page<DictType> list(Page<DictType> page, DictTypeQueryVo dictTypeQueryVo);
2
3
4
5
6
7
8
9
2
3
4
5
6
7
8
9
在 ServiceImpl 中实现 Service 接口的 list 方法
@Override
public Page<DictType> list(Page<DictType> page, DictTypeQueryVo dictTypeQueryVo) {
    return getBaseMapper().list(page, dictTypeQueryVo);
}
2
3
4
2
3
4
# 实体 Entity
Entity 是实体类,和数据库的表结构对应。
SoFast 框架中 Entity 由代码生成器自动生成,开发人员可基于定制需求进行修改。
# Entity 的规范
# Entity 类文件解耦合
Entity 类建议放到 feign sdk 中,然后通过 maven 进行依赖,不建议将 Entity 类直接放在具体服务中。
在微服务架构中,一般会存在服务之间的调用,此时被调用服务的返回值实体类需要调用方进行解析,如果放在 feign sdk 中,调用方可直接使用,非常方便,即可 feign 接口修改,也只需升级 maven 中的依赖即可。
当然,如果该服务没有任何外部调用,那 sdk 是非必须的,将 Entity 类直接放入服务中也可以。
# Entity 主键
在 SoFast 框架中,主键 id 默认是使用的 Mysql 自增主键,因此在 Entity 类中 id 字段需要追加 @TableId 注解,如下所示,注解 @TableId 的 type 属性需要指定成 IdType.AUTO,否则不会使用自增策略。
@ApiModelProperty(value = "主键")
@JsonFormat(shape = JsonFormat.Shape.STRING)
@TableId(value = "id", type = IdType.AUTO)
private Long id;
2
3
4
2
3
4
# 主键过大问题
当 Entity 的 id 值过大后,通常为超过 2 的 53 次方(9007199254740992),传递到前端页面后,会出现精度丢失的问题。
根本原因是因为 js number 类型的最大安全值问题。
解决方案:
增加 @JsonFormat 注解,将传递给前端的类型变成字符串。
@JsonFormat(shape = JsonFormat.Shape.STRING)
这种方案只是修改传递的 json 类型,并不需要修改 Entity 中的 id 类型和数据库的类型。
如果想要使用雪花算法或用户自定义主键,可通过修改 @TableId 注解实现。
// 使用雪花算法生成主键(数值或字符串类型)
@TableId(value = "id", type = IdType.ASSIGN_ID)

// 使用UUID生成主键(字符串类型,且不带"-")
@TableId(value = "id", type = IdType.ASSIGN_UUID)

// 开发人员自己生成主键
@TableId(value = "id", type = IdType.INPUT)
2
3
4
5
6
7
8
2
3
4
5
6
7
8
# 自动填充
在数据库插入或更新时,对于一些特定字段往往需要填充固定的信息,如创建者、创建时间、更新者、更新时间等。在 SoFast 中可以通过注解开启自动填充功能。
@ApiModelProperty(value = "创建者")
@TableField(fill = FieldFill.INSERT)
private Long createUser;

@ApiModelProperty(value = "创建时间")
@TableField(fill = FieldFill.INSERT)
private Date createTime;

@ApiModelProperty(value = "更新者")
@TableField(fill = FieldFill.INSERT_UPDATE)
private Long updateUser;

@ApiModelProperty(value = "更新时间")
@TableField(fill = FieldFill.INSERT_UPDATE)
private Date updateTime;
2
3
4
5
6
7
8
9
10
11
12
13
14
15
2
3
4
5
6
7
8
9
10
11
12
13
14
15
FieldFill.INSERT 只在 inset 时自动填充
FieldFill.INSERT_UPDATE 在 inset 和 update 时都可自动填充
在 SoFast 框架中,自动填充时由框架自动处理的,以下是实现类(内置在框架中),开发人员也可根据自己的需求进行定制实现。
@Component
@ConditionalOnClass(MetaObjectHandler.class)
public class SolMetaObjectHandler implements MetaObjectHandler {

    private static final String CREAT_USER = "createUser";
    private static final String CREAT_TIME = "createTime";
    private static final String UPDATE_USER = "updateUser";
    private static final String UPDATE_TIME = "updateTime";

    private static final String DELETE_FLG = "deleteFlg";

    @Autowired
    private StrictFillProperties strictFillProperties;

    /**
     * 自动填充CREAT_USER、CREAT_TIME、删除FLG
     *
     * @param metaObject
     */
    @Override
    public void insertFill(MetaObject metaObject) {
        // mybatis自动填充
        Long userId = LoginUserContextHolder.getUserId();
        this.strictInsertFill(metaObject, CREAT_USER, Long.class, userId);
        this.strictInsertFill(metaObject, CREAT_TIME, Date.class, SolDateUtils.currentDate());
        this.strictUpdateFill(metaObject, UPDATE_USER, Long.class, userId);
        this.strictUpdateFill(metaObject, UPDATE_TIME, Date.class, SolDateUtils.currentDate());
        this.strictInsertFill(metaObject, DELETE_FLG, Integer.class, Constants.DELETE_FLG_FALSE);
    }

    /**
     * 自动填充UPDATE_USER和UPDATE_TIME
     *
     * @param metaObject
     */
    @Override
    public void updateFill(MetaObject metaObject) {
        this.strictUpdateFill(metaObject, UPDATE_USER, Long.class, LoginUserContextHolder.getUserId());
        this.strictUpdateFill(metaObject, UPDATE_TIME, Date.class, SolDateUtils.currentDate());
    }

}
2
3
4
5
6
7
8
9
10
11
12
13
14
15
16
17
18
19
20
21
22
23
24
25
26
27
28
29
30
31
32
33
34
35
36
37
38
39
40
41
42
2
3
4
5
6
7
8
9
10
11
12
13
14
15
16
17
18
19
20
21
22
23
24
25
26
27
28
29
30
31
32
33
34
35
36
37
38
39
40
41
42
# 数据传输对象 Domain
Domain 并不是必要的
so-fast 框架规定在进行复杂的数据传输时,需要使用 Domain 进行规范定义和数据传输。
# Domain 的分类
so-fast 中 domain 分为 vo 和 dto 两类,vo 为视图模型,主要用于展现层;dto 是数据传输模型,主要用于服务层数据传输。
在 so-fast 框架中,vo 和 dto 并没有按照严格的模型规范来设计,主要是为了减少重复的 javabean 对象,必要的情况下,可以进行模型合并。一切为了在能清晰表达数据流的基础上的极简开发。
# 使用方式
例如,在多条件搜索的业务场景下,需要定义搜索条件的 vo 对象。
/**
 * 字典类型查询条件
 *
 * @Package: com.sofast.system.dict.domain.vo
 * @Description: 字典类型查询条件VO
 * @Date : 2020/11/21 9:25 PM
 * @Author : NCIT
 */
@ApiModel(value = "字典类型查询接口VO")
@Data
public class DictTypeQueryVo extends PageRequestBaseVo {

    @ApiModelProperty(value = "字典名称")
    private String dictName;

    @ApiModelProperty(value = "字典类型")
    private String dictType;

    @ApiModelProperty(value = "状态(0正常 1停用)")
    private String status;

}
2
3
4
5
6
7
8
9
10
11
12
13
14
15
16
17
18
19
20
21
22
2
3
4
5
6
7
8
9
10
11
12
13
14
15
16
17
18
19
20
21
22
对于有分页需求的必须 extends PageRequestBaseVo,PageRequestBaseVo 中定义了分页所需的通用条件,以及日期范围搜索的条件。
# Feign 接口开发
微服务间的相互调用需要开发 Feign 接口。
在 sofast 框架中,微服务间的 rpc 使用 Feign 来实现。
# SDK
Feign 接口需要提供给其他工程进行调用,因此 Feign 接口需要对外提供包括 url、入参、返回体等具体信息供其他服务直接使用,为避免重复定义,sofast 规定必须开发 sdk 工程,其规范如下:
需要创建对应微服务的 sdk
sdk 中定义好接口、url 常量、entity、feign 的熔断处理等
调用方和被调用方同时依赖该 sdk
Good:
# Feign 接口实现
sdk 开发好后,微服务需要依赖该 sdk,并实现接口逻辑:
Good:
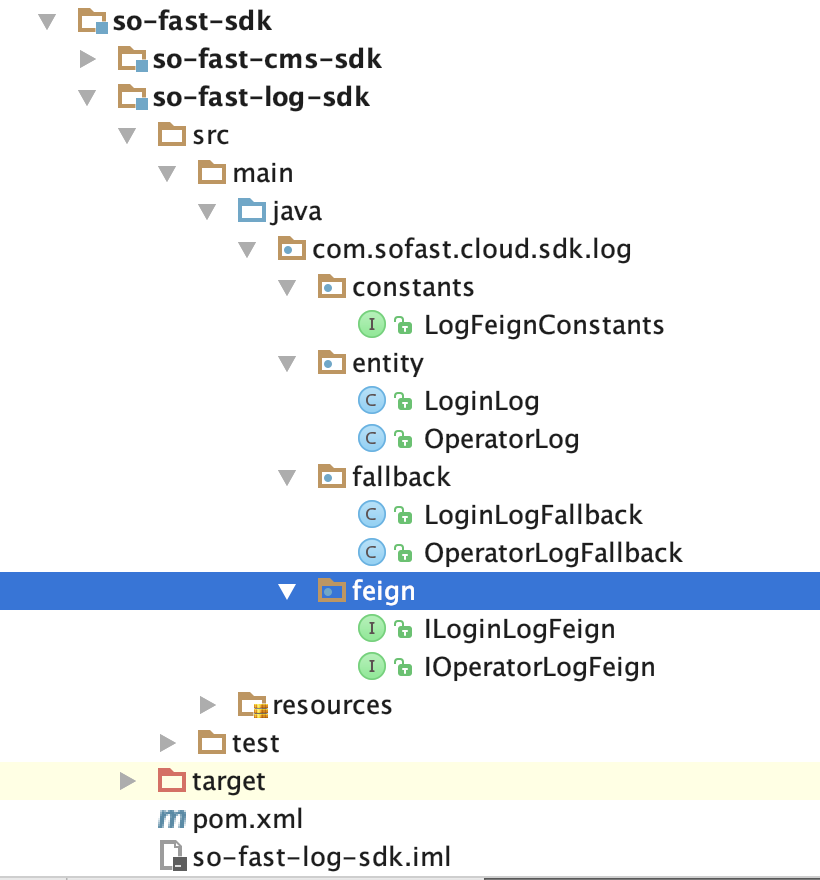
依赖 sdk
        <dependency>
            <groupId>com.sofast.cloud</groupId>
            <artifactId>so-fast-log-sdk</artifactId>
        </dependency>
2
3
4
2
3
4
实现接口逻辑
@Slf4j
@RestController
@Api(tags = "操作日志远程调用")
public class OperatorLogFeignProvider implements IOperatorLogFeign {

    @Autowired
    IOperatorLogService iOperatorLogService;

    @ApiOperation(value = "操作日志", notes = "操作日志保存")
    @PostMapping(LogFeignConstants.FEIGN_OPERATOR_LOG)
    @Override
    public R<Boolean> save(@RequestBody OperatorLog operatorLog) {
        return R.data(iOperatorLogService.save(operatorLog));
    }
}
2
3
4
5
6
7
8
9
10
11
12
13
14
15
2
3
4
5
6
7
8
9
10
11
12
13
14
15
# LoginUserContextHolder
LoginUserContextHolder 是获取当前用户信息的上下文 Tip:该上下文中的数据是由 so-fast-web-starter 中的 LoginUserInfoFilter 进行初始化的; 如发现该上下文中无数据请先确认工程中是否使用了 so-fast-web-starter 程序包,如未使用请自行维护该上下文的生命周期
原则上所有 web 服务都必须使用 so-fast-web-starter 程序包
# setLoginUserInfo
设置当前线程中的登录用户信息 (未使用 so-fast-web-starter 时需要自行维护该数据)
// 目前LoginUserInfo中提供两个构造函数
// 无用户所属机构(web-starter中默认使用)
LoginUserInfo loginUserInfo = new LoginUserInfo(userId, userName, roleList);

// 包含用户所属机构
// LoginUserInfo loginUserInfo = new LoginUserInfo(userId, userName, roleList);
LoginUserContextHolder.setLoginUserInfo(loginUserInfo);

// PS:使用完毕之后记得清除当前用户数据 否则可能会在线程复用的场景会产生一些无法预料的问题
1
2
3
4
5
6
7
8
91
2
3
4
5
6
7
8
9
# clear
清空当前线程中的登录用户信息数据
LoginUserContextHolder.clear()11# getLoginUserInfo
获取当前线程中的登录用户信息
LoginUserContextHolder.getLoginUserInfo()

Return: LoginUserInfo {
    // 用户ID
    Long userId;
    // 登录用户名
    Long userName;
    // 组织结构ID
    Long orgId;
    // 用户授权角色的编码集合
    Long roleList;
}
1
2
3
4
5
6
7
8
9
10
11
121
2
3
4
5
6
7
8
9
10
11
12
# getUserId
获取当前线程中的登录用户 Id
LoginUserContextHolder.getUserId()

Return: (Long) userId
1
2
31
2
3
# getUserName
获取当前线程中的登录用户名(非 realName)
LoginUserContextHolder.getUserName()

Return: (String) userName
1
2
31
2
3
# getOrgId
获取当前线程中的登录用户所属机构(当前版本暂未支持)
LoginUserContextHolder.getOrgId()

Return: (Long) orgId
1
2
31
2
3
# getRoleList
获取当前线程中的登录用户的角色编码集合
LoginUserContextHolder.getRoleList()

Return: (List<String>) roleList
1
2
31
2
3